Expense Import
Import expenses into Projector in bulk using csv, qfx, qif, ofx, and qbo formats. This feature is commonly used to import credit card statements. The import feature is supported by expense reports, soft cost documents, and vendor invoices.
Permissions and Settings
Imports are limited to 2000 cost cards at a time.
Different permissions are required depending on what kind of expenses you are trying to import.
Expense Reports
To upload cost cards to an expense report you must have one of the following:
- Be a resource
- Have the cost center permission Maintain Expenses
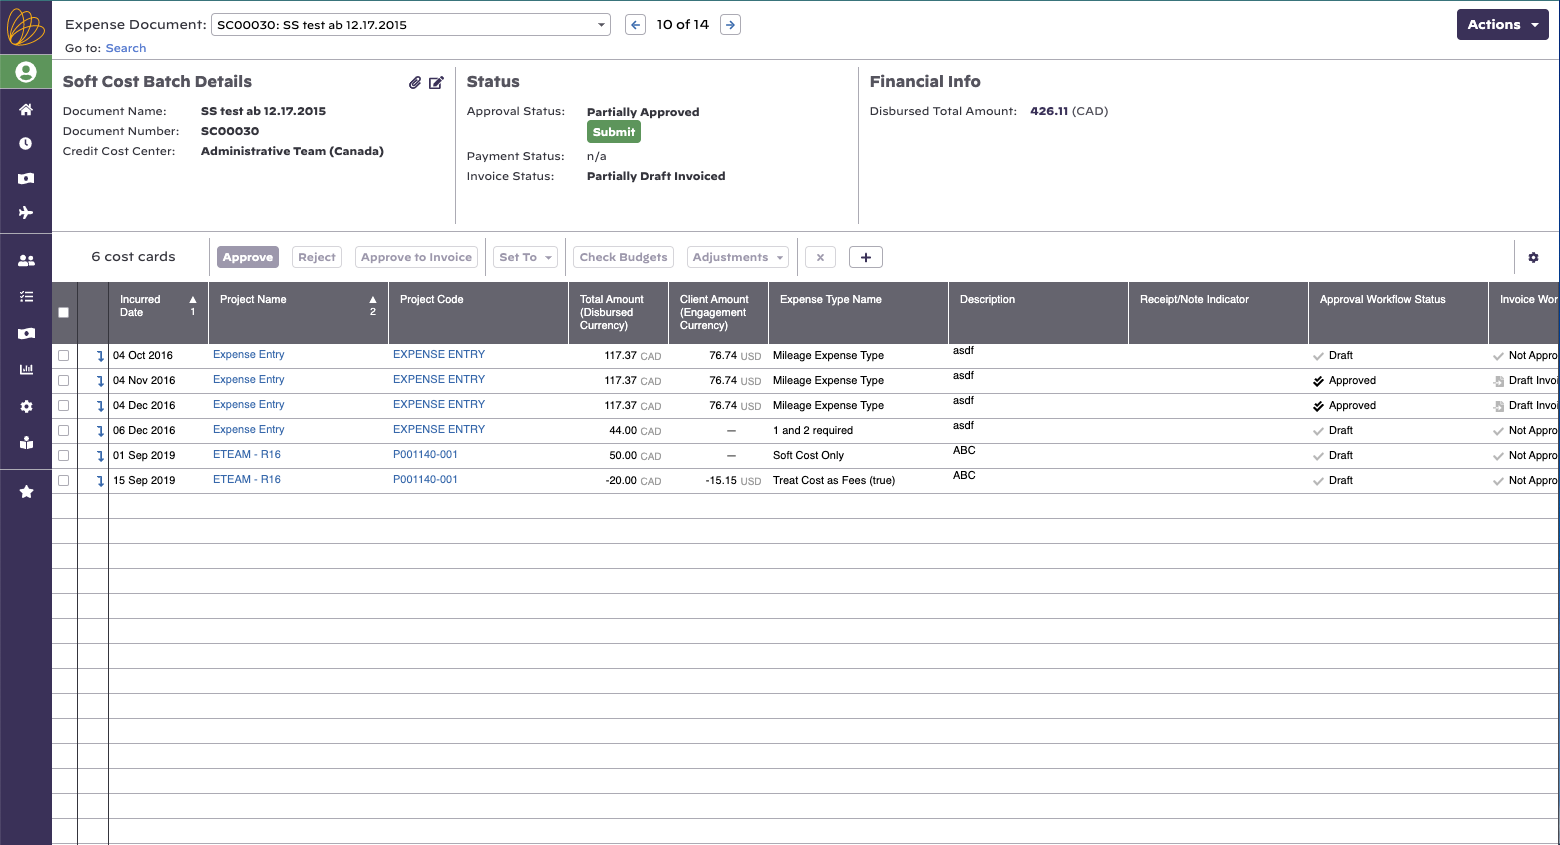
Soft Costs
To upload cost cards to soft cost document:
- Have the cost center permission Maintain Soft Costs
Vendor Invoices
- Have the cost center permission Maintain Vendor Invoices
Supported File Formats
Projector supports the following formats
| Format | Name | Description |
|---|---|---|
| CSV | Comma separated values | One of the most universal formats, a csv file is a simple text file where each value is separated by a comma and each row is a new set of data. Your csv files can have a header row. Projector will detect and exclude this row. All popular spreadsheet programs like Excel and LibreOffice Calc support csv import and export. |
| QIF | Quicken Interchange Format | A widely supported, free to use file format. |
| QFX | Quicken Web Connect | A successor to QIF |
| OFX | Open Financial Exchange | A freely licensed file format for financial information |
| QBO | QuickBooks Online | A QuickBooks online bank statement file that contains your electronic statement from your online account. |
Expense Report Fields
The below table contains all the fields that you can map into an expense report cost card. Please notice that there are no fields for importing currency and FX rates. These need to be specified manually after the import process is complete.
| Field | Description | Expected Format |
|---|---|---|
| Total Due | The incurred expense amount | Do not include currency symbols. We support multiple number formats. When you import your file you will need to specify which one your files uses. Negative numbers will result in negative cost cards.
|
| Date | The incurred date of the expense | We support multiple date formats:
|
| Description | Specify text up to 1000 characters long. Anything longer will be truncated. | String |
| Project | This can contain either a project code or a project name. If it contains a code then Projector will find and match the cost card to the project. If it contains a name, then Projector will not match match to a project of the same name, even if the names are exactly the same. Rather, it will use that name as a quick search so that you can pick a project with the correct code. Why not choose it for you? Two projects can have the same name, we are trying to avoid that confusion. | String |
| Expense Type | Should exactly match the expense type name as seen in the Expense Type Editor | String |
| Location | The location must be available for expense entry. If no locations are available for entry then this field will not be shown. Should exactly match the location name as seen in the Location Editor. | String |
| Non-chargeable | Should the client be charged for this expense? Only available if enabled via system settings. | True if 'Yes', 'null', or blank False if the entry is anything else |
| Paid By | If your expense was paid by a company credit card then specify which one here. Should exactly match the vendor name as seen in the Vendor Editor | String |
| Units | If this is a unit based expense, then enter the number of units | Float using up to 4 decimal places |
| UDF | Your installation may have special fields defined by your administrator. Here we call it UDF for User Defined Field, but the name you see will probably differ. For instance, you might see Vendor and you would be expected to enter American Airlines or McDonalds. | The expected format depends on the type of UDF.
|
| Handy Info | Notes for yourself about this expense. Used only during import to help you figure out how to map fields properly. Then discarded. | String |
Vendor Invoice and Soft Cost Fields
The below table contains all the fields that you can map into a soft cost or vendor invoice cost card.
| Field | Description | Expected Format |
|---|---|---|
| Incurred Date | Date the expense was incurred | We support multiple date formats:
|
| Expense Type | Should exactly match the expense type name as seen in the Expense Type Editor | String |
| Project | This can contain either a project code or a project name. If it contains a code then Projector will find and match the cost card to the project. If it contains a name, then Projector will not match match to a project of the same name, even if the names are exactly the same. Rather, it will use that name as a quick search so that you can pick a project with the correct code. Why not choose it for you? Two projects can have the same name, we are trying to avoid that confusion. | String |
| Description | Specify text up to 1000 characters long. Anything longer will be truncated. | String |
| Resource | The resource's display name as seen in the Resource Editor. | String |
| Location | The location must be available for expense entry. If no locations are available for entry then this field will not be shown. Should exactly match the location name as seen in the Location Editor. | String |
| Incurred Currency | The three letter currency code as shown in the Currencies and FX Rates Editor | String |
| Incurred VAT Amount | The amount of VAT incurred on this expense. |
|
| Incurred Total Amount | The total amount incurred, including taxes, in the "incurred currency." Typically the amount shown on a receipt. |
|
| Disbursed Total Amount | The total amount to be disbursed in the "disbursing currency" (based on the vendor's currency). Typically the amount that the company expects to reimburse the payment processor for. This may be a resource or a credit card. |
|
| Override Client Amount | The amount the client should be charged. |
|
| Units | If this is a unit based expense, then enter the number of units | Float using up to 4 decimal places |
In Practice
Follow these steps to execute your import.
Start Import
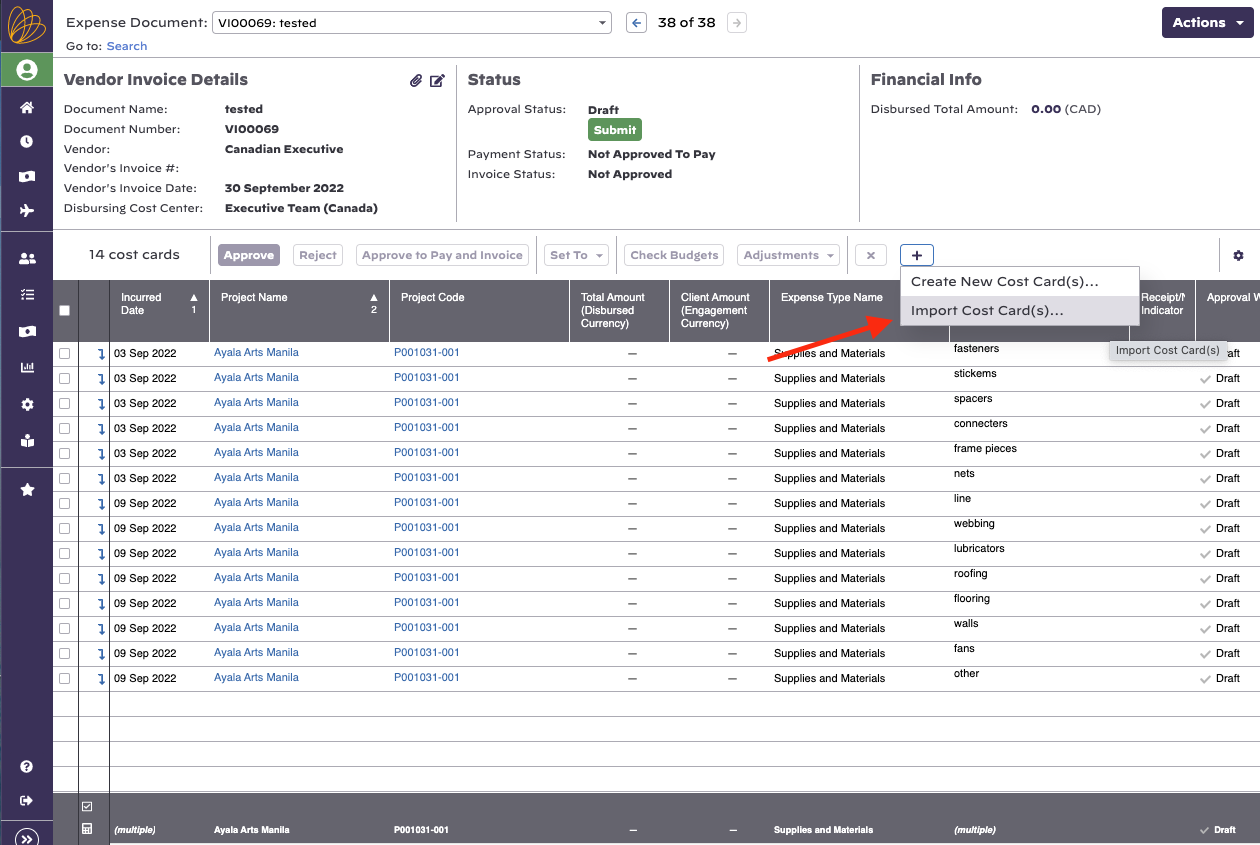
For vendor invoices and soft costs, edit any document or create a new one. Then click + | Import Cost Cards.
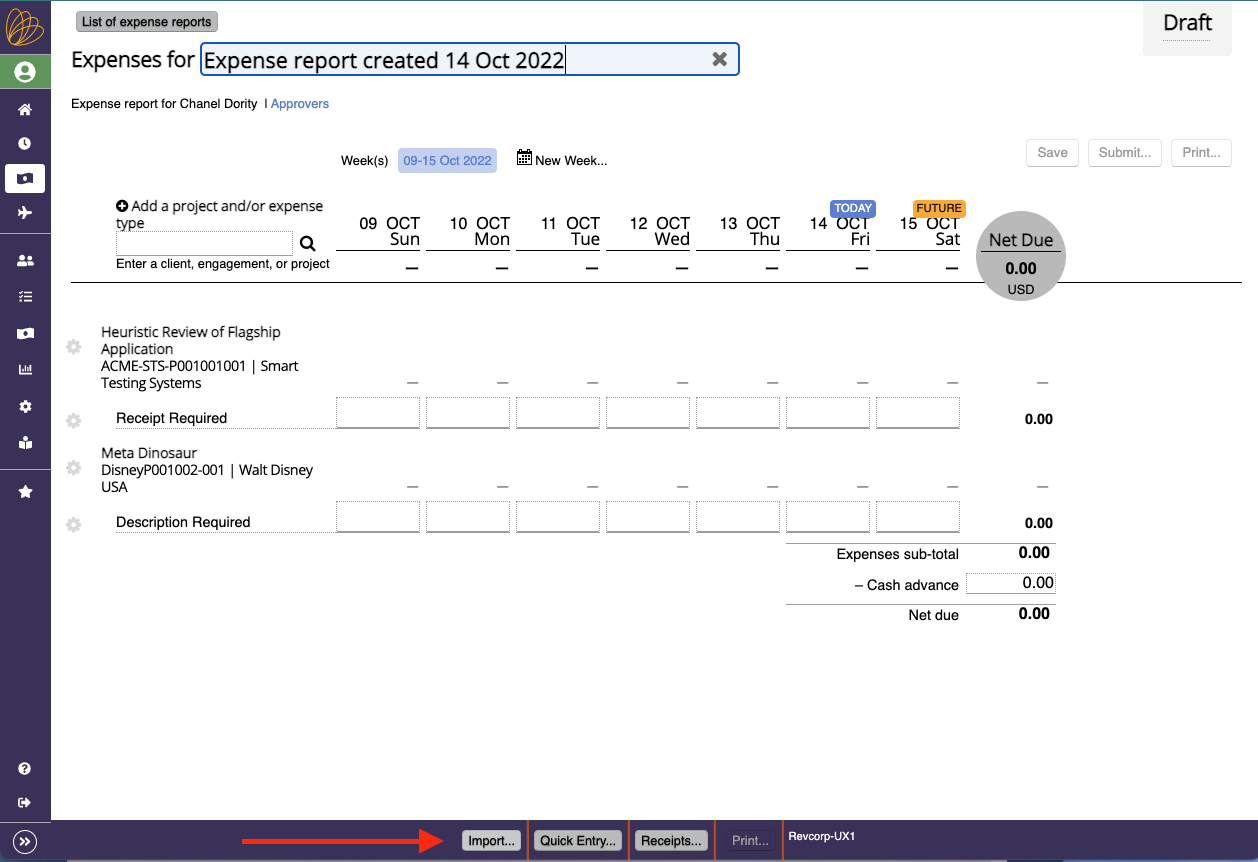
For expense reports, open any existing expense report. At the bottom of the screen click  at the bottom of the screen.
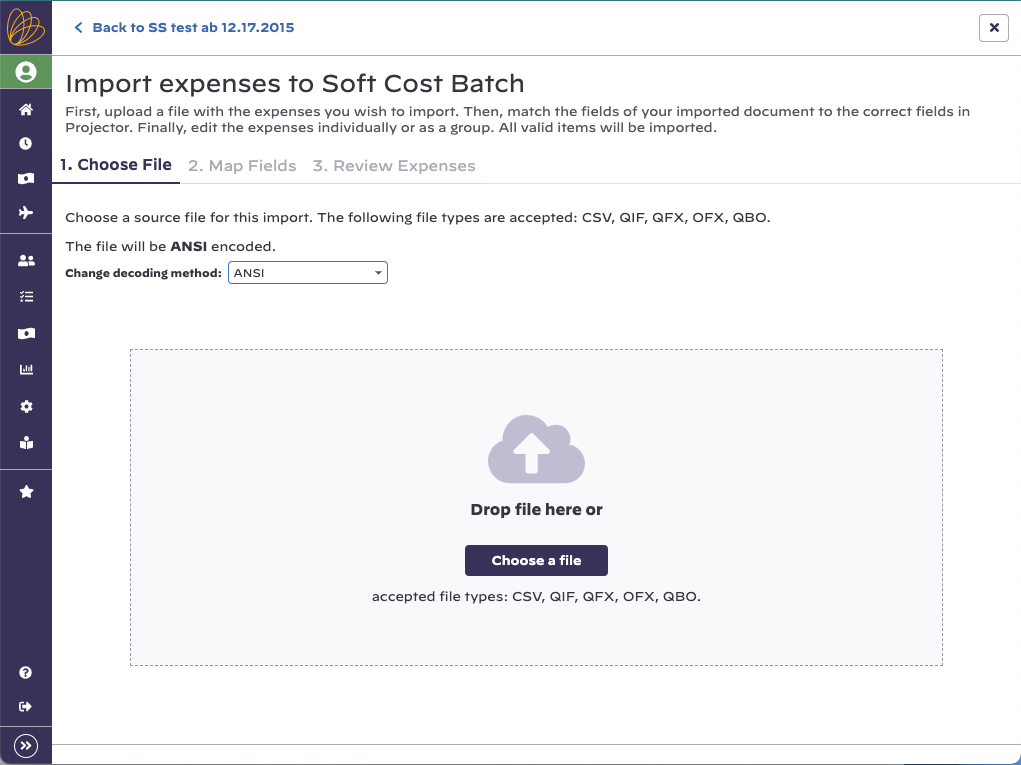
Choose Import File
Drag and drop a file into the import wizard or browse to one on your system. See the file types section above to see types we support. Once the file has finished uploading the wizard automatically moves to step two.
Map Fields
This is where you specify how the information in the uploaded file maps into Projector. On the left is a list of fields that you can import data into. All fields are optional.
Projector does its best to automatically map your file to the available fields. Manually fix any mismapped fields or specify mappings as needed. To do this, use the dropdown list next to a field. For example, Incurred Date in Projector maps to Bill Date on my credit card statement. We even show a little bit of preview data from your file so that you can ensure everything is correct.
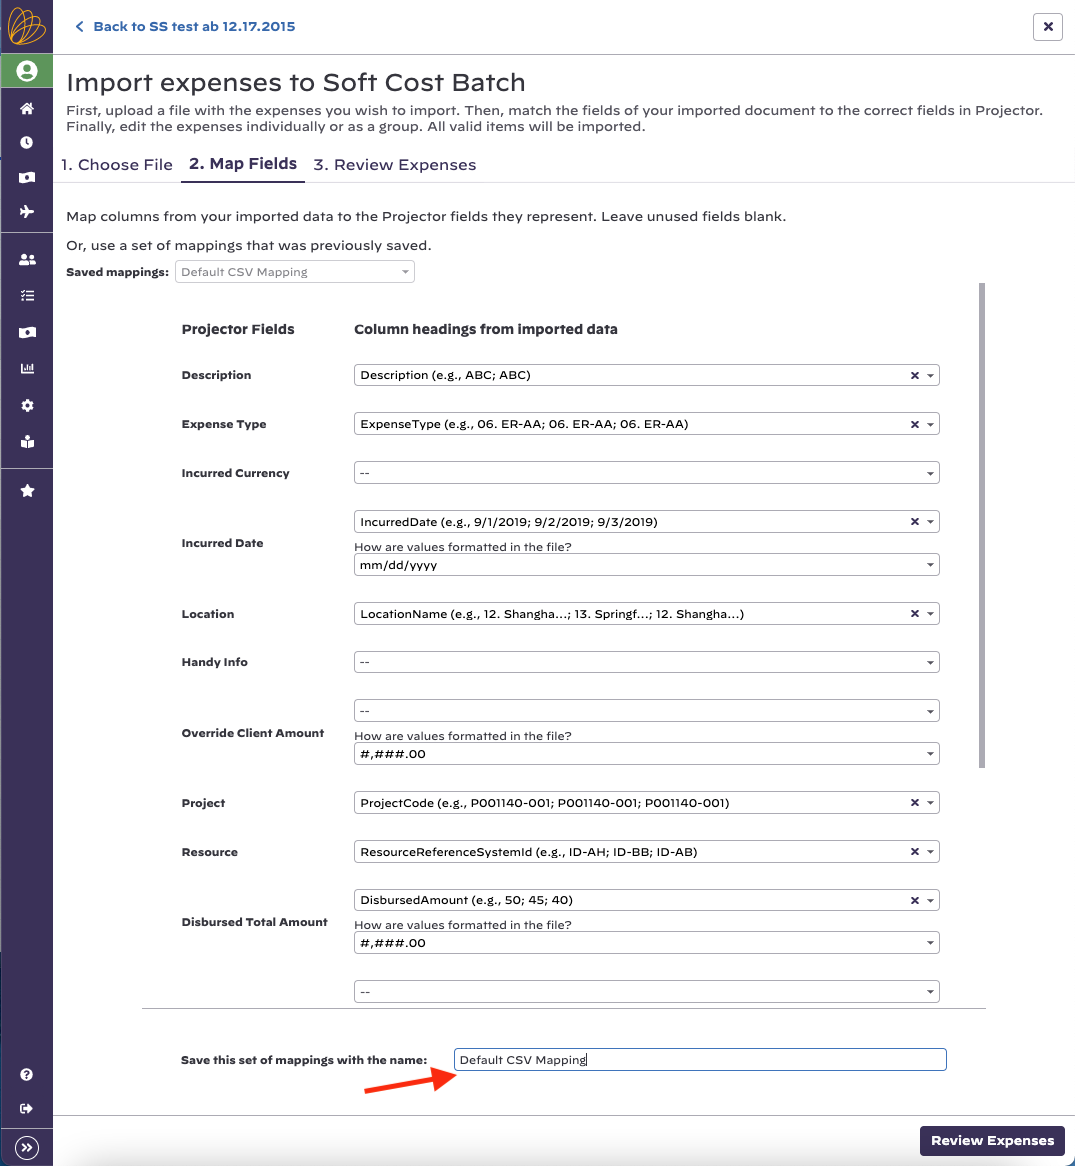
Saved Mappings
If you frequently upload a file in the same format, then you can optionally save your import settings for reuse later on. At the bottom of the form, simply type in a unique name so that you can identify it later. The next time you import cost cards, you'll have a nice dropdown at the top of the page where you can specify the mapping definition you want to use.
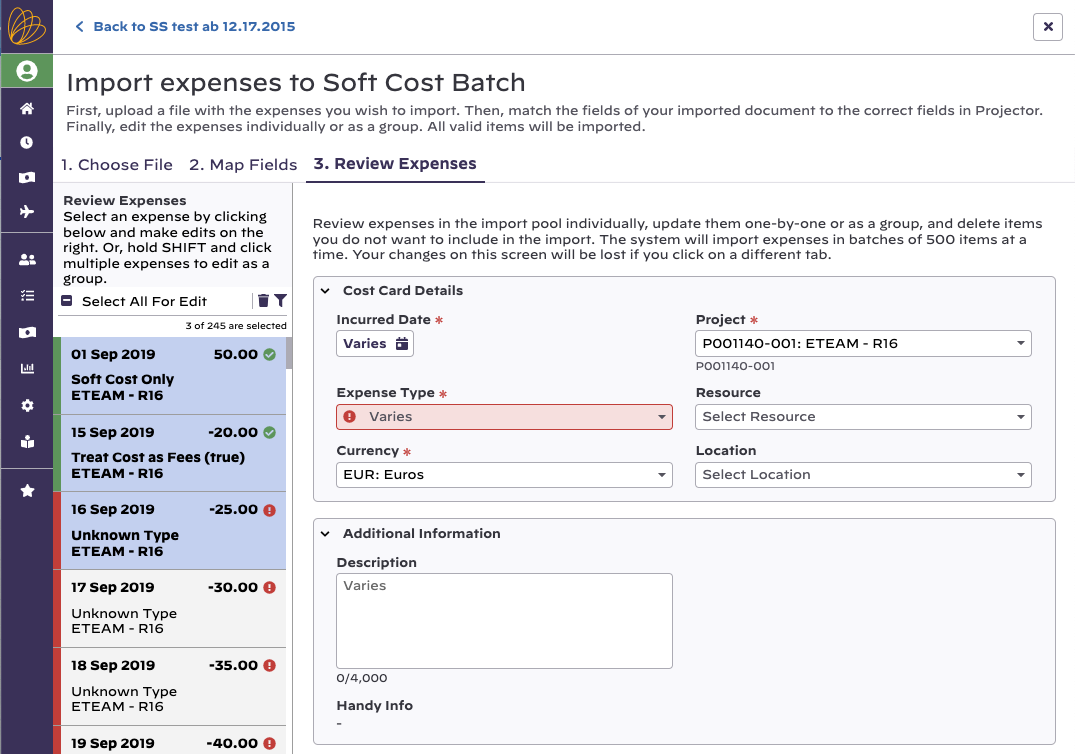
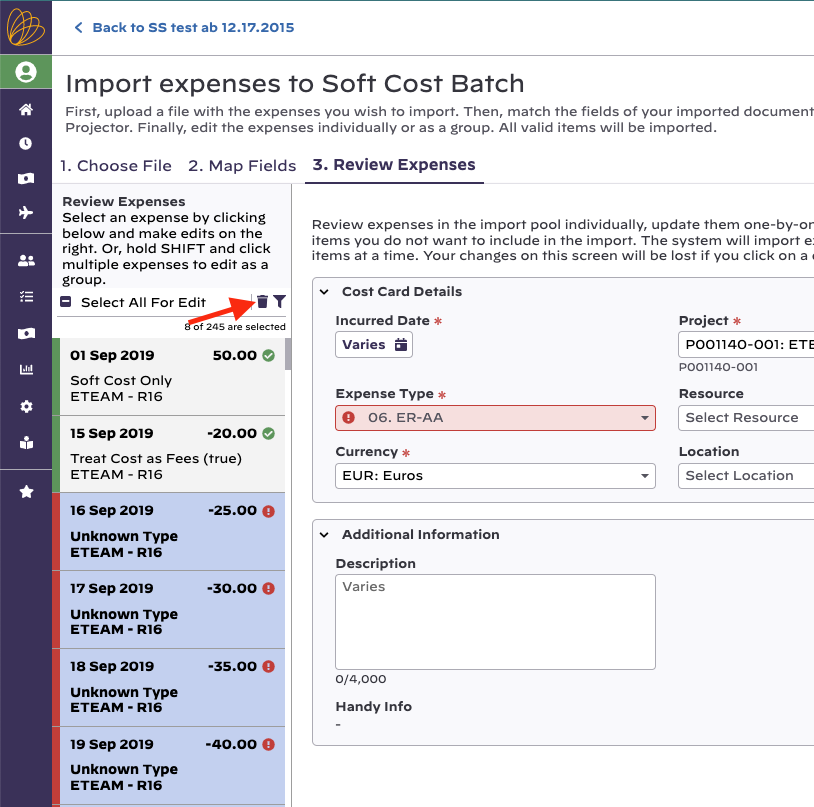
Review Expenses
Once you have completed your mapping, move onto step 3 - Review. Here you make corrections, determine which of the expenses you wish to import, and delete expenses that you are not interested in.
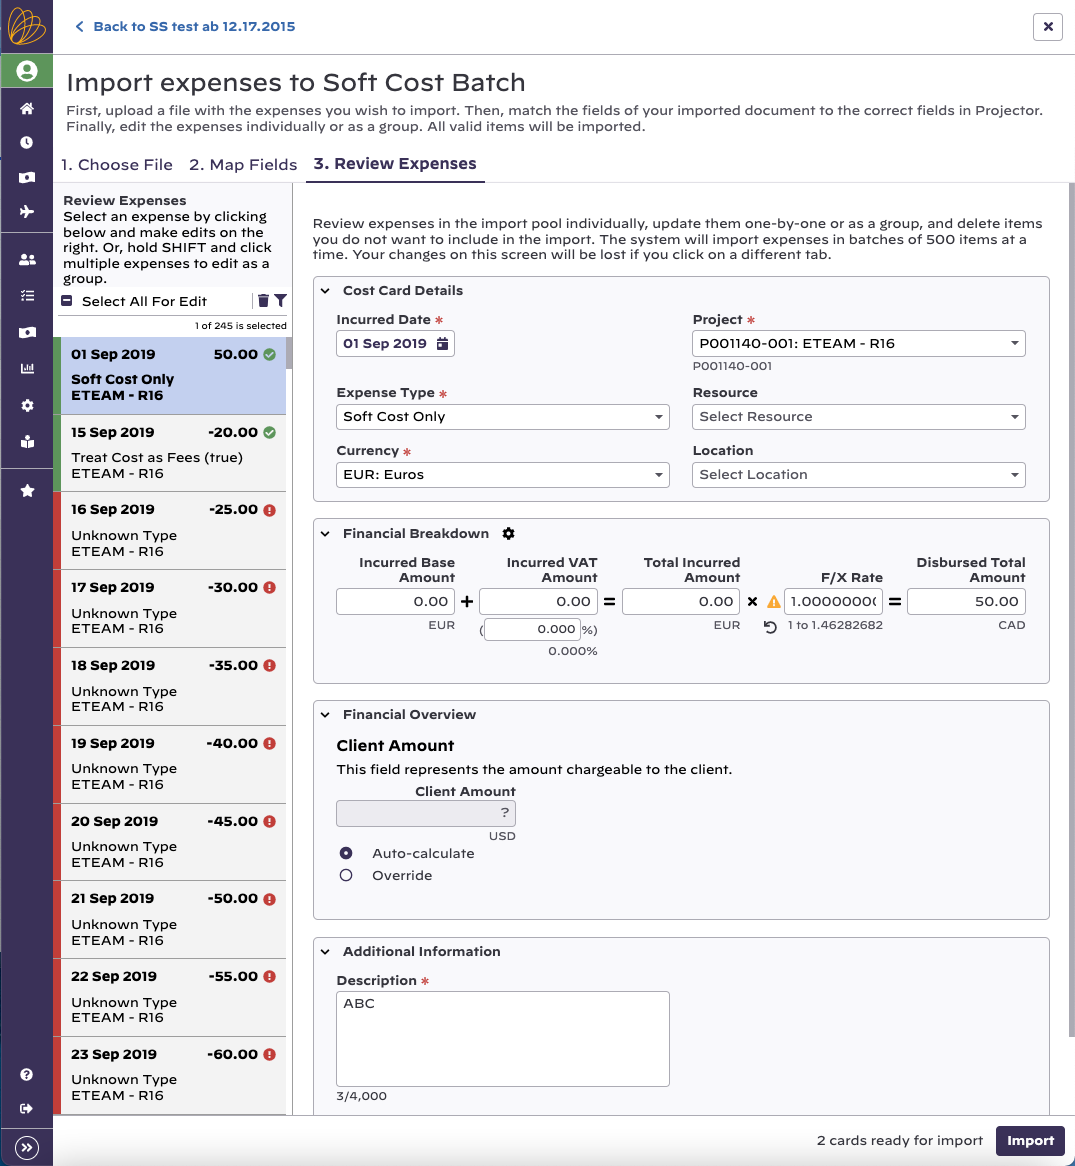
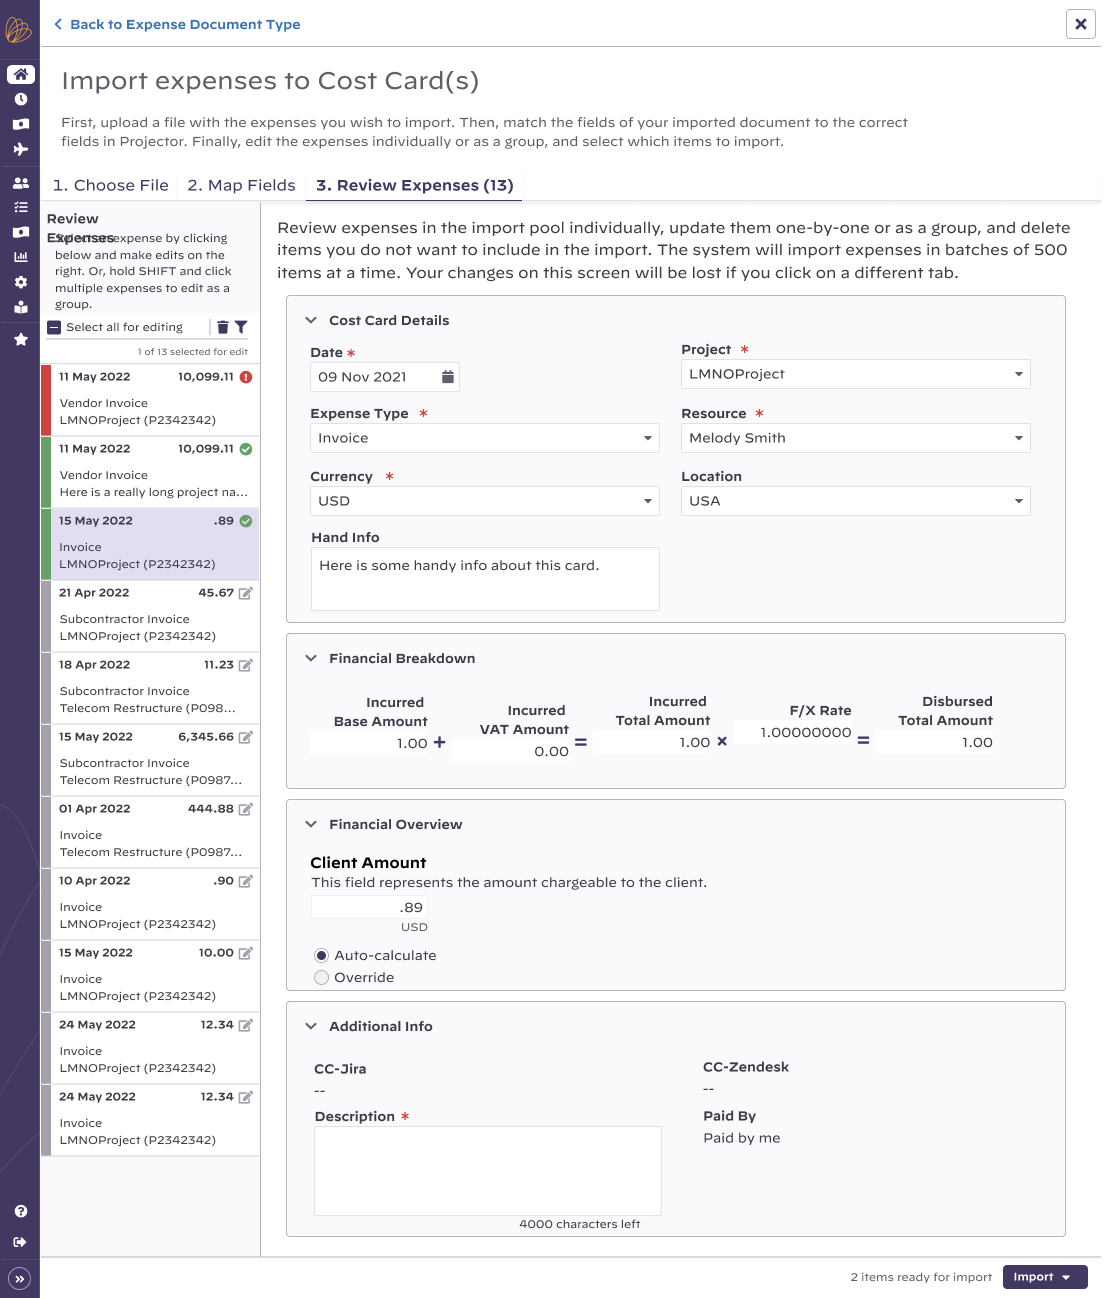
To begin, click an expense in the left hand column. You can multi-select by holding the ctrl key and clicking individual expenses or by holding the shift key to select a range of expenses.
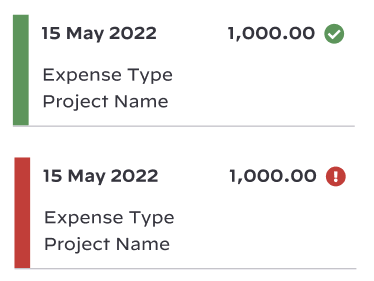
If a cost card is appears with a green border on the left and a green check icon, then it is ready for import.
If a cost card appears with a red border on the left and a red circle with an exclamation point, then the item must be edited in order to be ready for import.
Images below show the two different states.
Information about the card or cards is shown in the right hand pane.
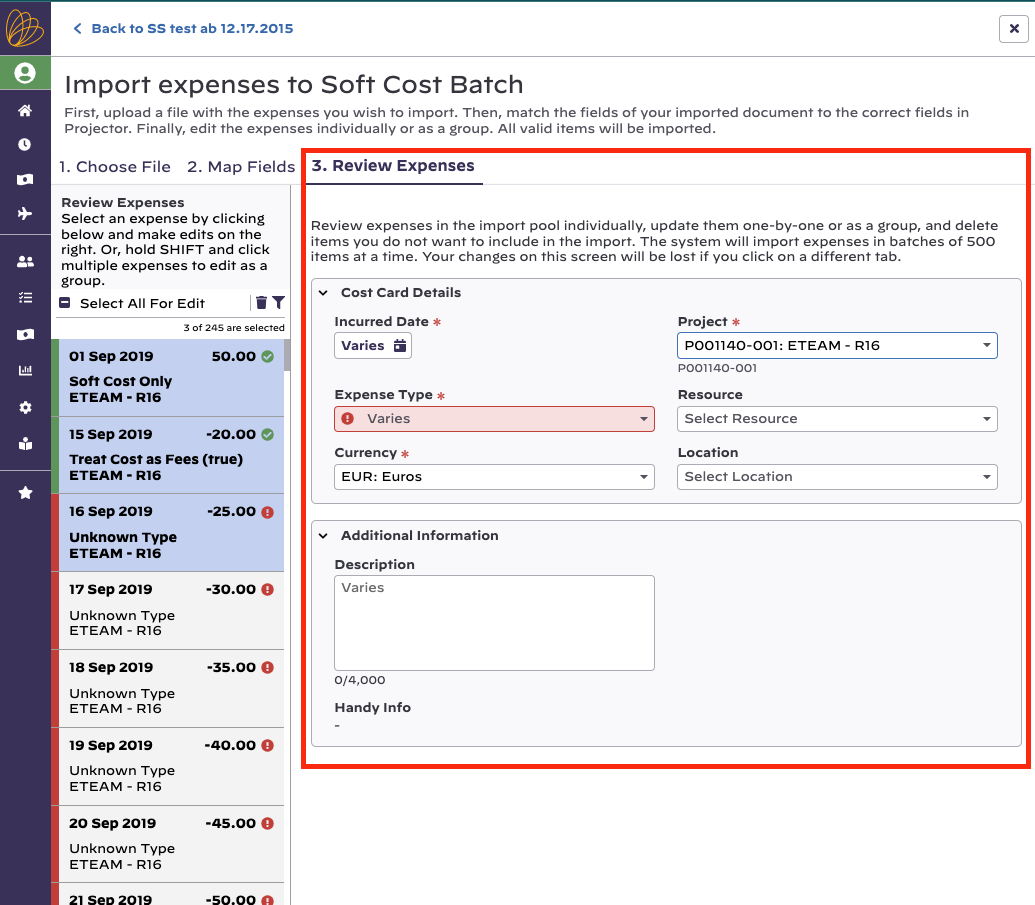
Make changes as you deem necessary. Anything highlighted in red requires attention before it can be imported. For example, if the imported expense type could not be found in Projector, you will need to pick a valid one from the dropdown list. If you have selected multiple cards at once, then all of them will change.
Any expenses that were not processed are saved for later and will appear the next time you open the import expense dialogue. If you are done with them, then use the Delete link to remove them from the sheet. All cards that appear with the green border and are valid will be imported. You must select and delete any cost cards you do not want to import.
After you click Import, you will see your new cost cards added to the expense document, where you can then approve them.