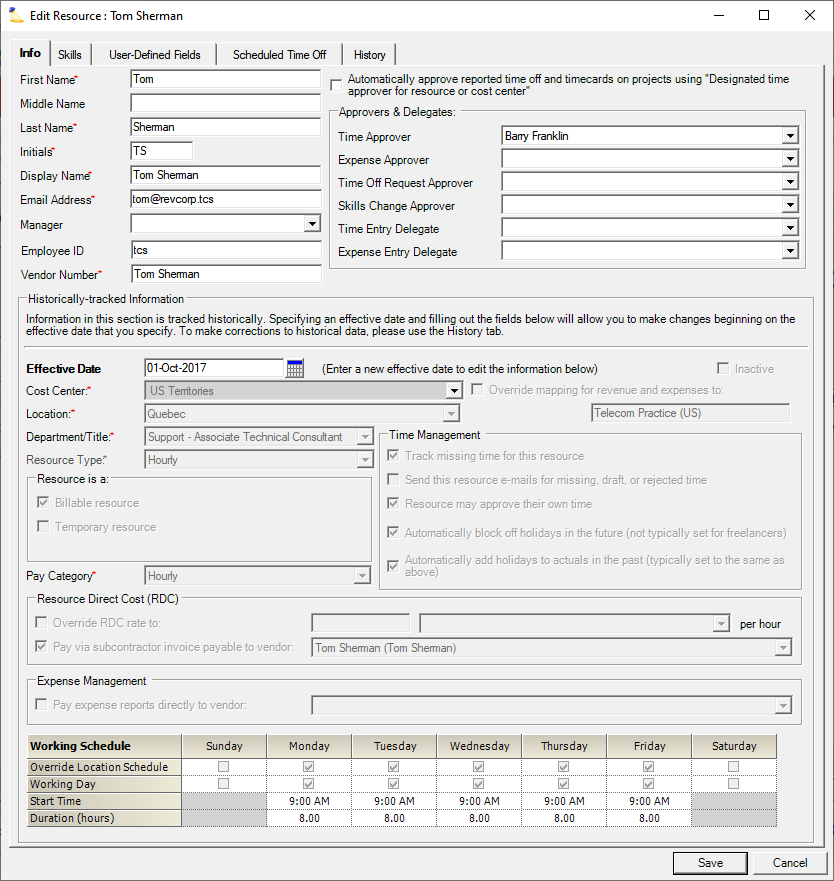
Resource Info Tab
The info tab is split into two sections. The upper section defines basic information about a resource like name, employee id, and email address that apply regardless of the resource's current status. The lower section contains time-phased information that can change over the days, months, or years that they work for you. Perhaps a resource's title changes, they switch locations, or they get a pay raise. By modeling them over time, your reports retain an accurate picture of who they are on any given date.
Probably the first thing you'll ask yourself when you get here is.... why is everything grayed out and how do I change it?!!!
Which leads me to the most important thing you need to take away from this help topic. If a resource's information has changed as of a certain date, you are in the correct place. For example, a promotion was earned, a contractor was hired full time, or somebody moved cost centers - you are in the correct place. Ungray all the fields by setting the Effective Date field to the day the changes occurred. This creates a new history row for the resource.
If a resource's information is historically wrong, you are in the wrong place! You need to fix it on the Resource History Tab.
This tab is reached by going to Administration tab | Users & Resources subsection | Resources and double clicking a resource.
Permissions and Settings
To view resources you must have the cost center permission View Resources.
To edit resource settings you must have the cost center permission Maintain Resources.
The Override Standard Resource Direct Cost (RDC) can potentially contain sensitive information. You can only view the information with the global permission Resource Direct Cost (RDC) Data set to View. To edit RDC you need both edit resource and edit RDC privileges.

You can override accounting transactions for revenue and expenses to a different cost center if you have the account setting Enable Resource Cost Center Mapping Overrides ticked. Most installations will not need to do this.

Your work schedule granularity is governed by your scheduling increment set on the System Settings Editor Scheduling Tab. For example, if your resources are scheduled in one hour blocks, you can only enter whole numbers. You cannot work more than 24 hours per day and hopefully nobody asks you to.
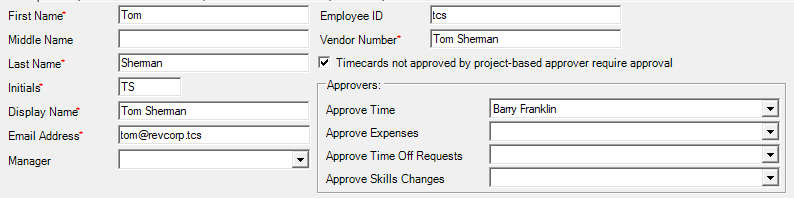
General Resource Information
The upper section contains global settings. These can be changed at any time and affect all the history for the user. Each setting is explained in the grid below.
Field | Description |
|---|---|
First Name | |
Middle Name | |
Last Name | |
Initials | Auto-populates with initials from the First Name, Middle Name, and Last Name fields. You can override to anything of your choosing. |
Display Name | Auto-populates based on the information entered in the First Name and Last Name fields, although you may override this procedure and type any name of your choosing. The display name must be unique for each resource. You can configure the default format from the Account Settings Editor. |
Email Address | The resource's email address. This will often be their login name to Projector too. |
| Manager | The resource's manager. This does not convey any particular permissions upon the manager, but is just provided to enable modeling of a hierarchical reporting structure that can be used for filtering. For instance, show all time cards for people that report directly to Tom, or show all time cards for people who report directly or indirectly to Tom (i.e., including people who report to people who report to Tom). |
Employee ID | The resource's employee id, usually defined by your finance department. |
Vendor ID | The name or number used to identify the resource as a vendor in the accounting system for the purposes of paying expense documents. If integrating with QuickBooks, this vendor id should match the vendor in QuickBooks. Twenty character length max. |
| Automatically approve reported time off and timecards on projects using "Designted time approver for resource or cost center" | This setting allows time cards submitted by this resource to be automatically approved in certain scenarios.
|
| Approve Time | The specified person gets to approve time in the following three situations:
|
| Approve Expenses | The specified person gets to workflow approve expenses in the following two situations:
|
| Approve Time Off Requests | Approve time off requests |
| Approve Skills Changes | Approve skill change requests |
| Time Entry Delegate | This person can access your timesheet and enter/submit time cards on your behalf. Often set on C-level users who have a secretary that enters their information into Projector for them. |
| Expense Entry Delegate | This person can access your expense reports and enter/submit cost cards on your behalf. Often set on C-level users who have a secretary that enters their information into Projector for them. |
Historically-tracked Information
The lower section let's you define attributes of the resource that are time-phased. For example, a resource is a subcontractor from Jan 1 until May 1, then on May 2 they were hired full-time. By time-phasing the information you get an accurate portrait of this resource when reporting in the past.
Probably the first thing you notice here is that all the settings are grayed out. Everything you see here is reflective of the resource's current status. The only field enabled is the date field, which shows the last time their status was updated. In the screenshot below you can see that this was Nov. 2014 for this resource. It is important that you understand the following piece so that if you make an edit here, you do it the correct way.
If the resource has had a change since the date shown, then you need to create a new history row. For example, a year later their location changed. You should change the date control to the day their location changed. This will enable all the fields for editing. Make the change and save.
This is different than if something is wrong about the resource. For example, they have the wrong title. In this case you want to go to the Resource History Tab and make the correction there. The distinction is whether something new has happened vs. correcting something in the resource's past.
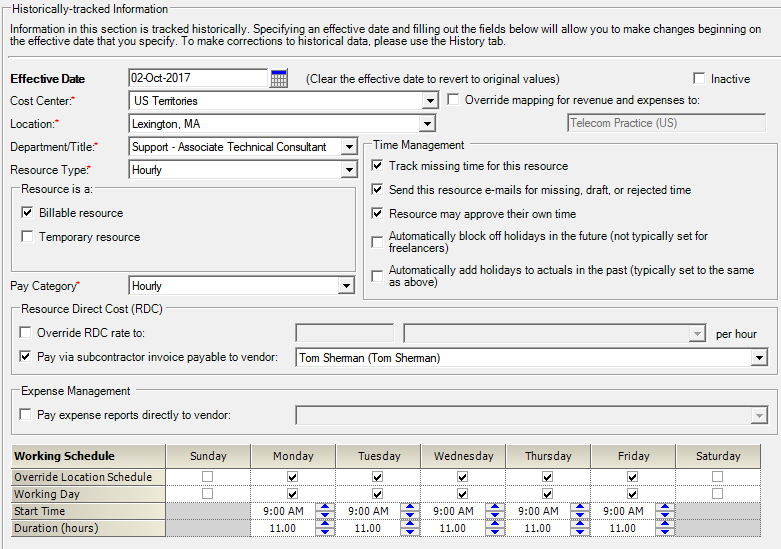
| Control | Description |
|---|---|
Inactive | Check this box to make the resource inactive. Inactive resources are unable to be assigned to new projects in Projector. However, inactive resources may be re-activated at any time. Some of the many uses of the Inactive feature include removing ex-employees without deleting them from past projects, and making users temporarily inactive while they are out on maternity leave or sabbatical. |
Start Date / Effective Date | If this is a new resource then specify their start date. If this is an existing resource, specify the date that their information last changed OR if you are correcting incorrect information, do it from the Resource History Tab instead. Entering a new date here will add a new history row. For example, from my start date to Jan 1 I was a subcontractor. On Jan 2 onward I was full time. |
Cost Center | What cost centers mean and how they are configured is unique to each organization. Choose the cost center that this resource belongs to. See the Cost Center Editor for more information. |
Override mapping for revenue and expenses to | You may override the mapping by checking this box and entering in the code manually. This section is only available if you tick the checkbox Enable Resource Cost Center Mapping Overrides in the Account Settings Editor. In general you should not need to do this. It is a legacy feature from before we had revenue splitting on engagements. |
Location | Choose a location for this resource from the drop down menu. This determines their typical mileage reimbursement rates, holidays, and working schedule (9-5). |
Department / Title | Choose a department and title for this resource from the drop down menu. This determines their base bill rates and compensation rates. |
Resource Type | A resource type is used for categorization in reports as well as to pre-populate a number of settings. Some example types might be Full-Time, Contractor, and Intern. The following settings will be autopopulated based on the type you choose. They can then be overridden on a per resource basis.
|
Resource is a: | Billable resource - This setting doesn't affect whether or not a resource can report billable time. It is used for reporting purposes only. You should tick it when a resource primarily logs billable hours. It is useful when you are trying to answer questions like, what is the billable utilization for my resources that typically do billable work? Temporary resource - This flag has been phased out in favor of Resource Types . It is used to check if the resource is non-permanent, such as a freelancer, temp, or contractor. It is used for reporting purposes only. It has no impact on user permissions. Resource Types are much better because they let you create whatever categories you want, plus define default permissions. |
Time Management: | Projector can track whether or not your resources have reported enough hours for the week. When they have failed to enter their hours, an optional email is sent out to remind them. Hourly resources can't have missing time, as by the definition of who they are, they only report as much time as they work. Track Missing Time for this resource - Check this box if you wish Projector to track missing time for this particular resource. Send this resource e-mails for missing, draft, or rejected time - E-mail reminders are sent for the previous eight weeks. After eight weeks it is assumed the time will not be entered and the emails stop. Resource may approve their own time - Check this box if you want to allow this resource to approve their own time. This happens in specific scenarios. For example, the Project Manager is marked as the time approver. When the PM enters their own time, they are their own approver. You can allow them to approve their own time, or require that it bubble up to their direct manager (as specified on this tab) or their cost center manager. Automatically block off holidays in the future (not typically set for freelancers) - Automatically add holidays to actuals in the past (typically set to the same as above) - |
Pay Category | Choose the category that describes how the resource is paid:
This field is generally for reporting purposes only. It has no affect on client billing or how much you pay them internally. Now that statement might not make sense to you, because if someone works overtime you may be charging the client more and you may be paying them more. That is true, but we don't use these flags to model that behavior. Rather, we use rate types and resource types to model overtime. I said "generally for reporting purposes only" because there is one exception. The Hourly option must be selected if you are using our subcontractor invoicing feature. |
| Resource Direct Cost | Tick this box to override standard RDC and define the hourly cost in a specific currency. RDC is the internal, hourly cost of a resource. This rate is typically an estimate based on title, but you can enter a specific value when necessary. This is often used for contractors who have a very specific hourly cost. Because RDC is often a sensitive number, you can only view and edit this section if you have the global permission Resource Direct Cost (RDC) Data. Override RDC rate to - enter the hourly rate Currency - currency this resource is reimbursed in Pay via subcontractor invoice payable to vendor - If this is a subcontractor that tracks their time in Projector, then tick this checkbox. Then select from the dropdown list the vendor that they work for. |
| Expense Management | Pay expense reports directly to vendor - when ticked, a resource can only enter expenses that were paid by a vendor. Typically a company issued credit card. A resource won't be able to enter expenses that they have paid out of their own pocket, but must ask an expenses manager to do it for them. |
Working Schedule | Set the days of the week and the hours of each day that this resource typically works. Their default schedule is determined by their location. For instance, a France location would have a 35 hour work week whereas a US location would have a 40 hour week. If this resource has a non-standard work week, then you can modify their schedule as necessary. For example, if you worked a four day instead of a five day workweek. To override their schedule, tick the checkbox in the Override row for each day that is different from the standard.
|