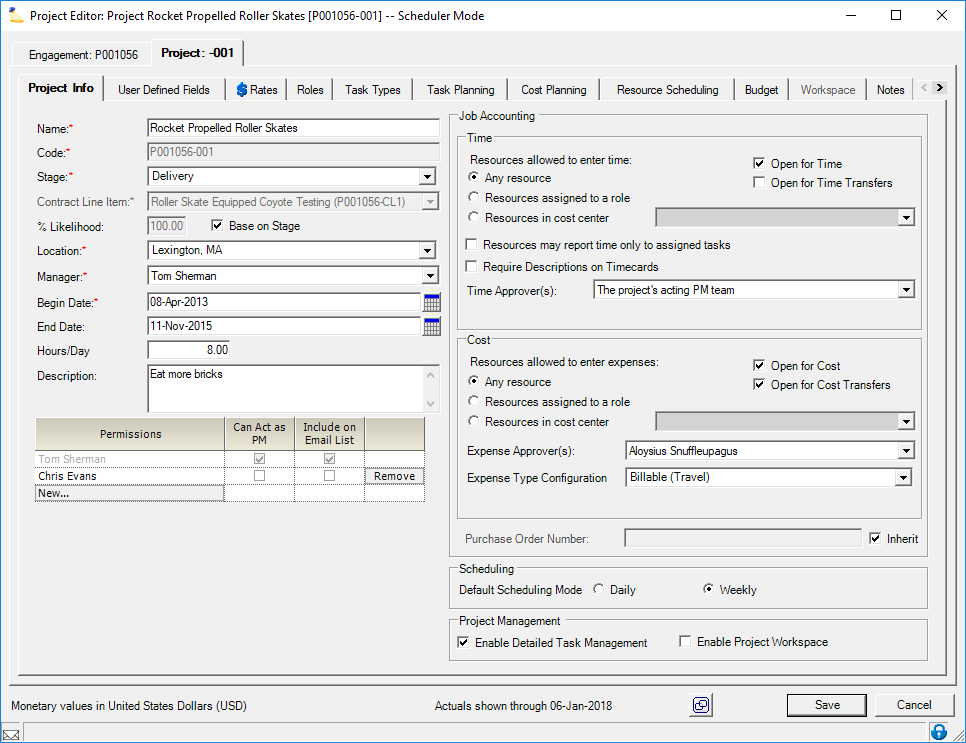
Project Info Tab
The project info tab manages a number of high level project settings. It is typically used by engagement and project managers for managing project stages, the PM team, and time/expense approval. Many of the settings may be auto-populated based on the project's engagement type. For an introduction to projects in general please see Engagements and Projects.
This tab is reached by opening a project and selecting the Project Info tab.
Permissions and Settings
The following two groups can make changes on this tab:
- have the cost center permission Maintain Projects and Engagements
- the current project stage allows Edit Project Info AND you are one of the following
- Engagement Manager
- Projector Manager
- Users with the cost center permission Can Act as PM
- Explicitly added as Can Act as PM
Your PM team includes anyone with the cost center permission Can Act as PM.
A large number of things you can or cannot do are governed by stage settings. For a detailed list, please see the stage editor help. You'll want the section titled "Project Managers Can...."
The Enable Detailed Task Management field will be grayed out if your account settings disallow DTM.
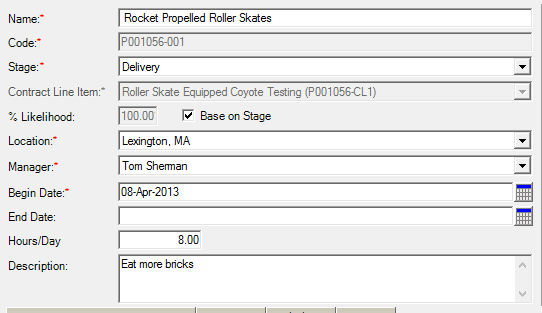
Project Information
The left side of the project info tab contains several high level fields described in the grid below.
Control | Description |
|---|---|
Name | The name of this project. When creating a new project, it will default to the same name as that provided on the Engagement Info tab. You may change the project name by typing in the field. Maximum of 255 characters. |
Code | This field may or may not be editable depending on your installation settings. It typically auto populates using a numbering scheme of your choosing. See Auto Numbering of Clients, Engagements, and Projects for more information. |
Stage | Stages govern both permissions and user interactions with a project. Use the dropdown to move the project between stages. For a full explanation of each stage and how stages can optimize your project workflow, please see the Stage Editor. Stages control:
To actually move a project to a new stage requires any one of several permissions. |
| Contract Line Item | This field can only be set on initial project creation. It is a required field. Your options on this dropdown are determined by the Contract Line Items defined on the Engagement Contract Tab. Contract Line Items are essentially a business rule of a contract. For example, this part of the contract is for five thousand dollars of labor. This project is responsible for delivering that part of the contract. Multiple projects can contribute to a single Contract Line Item. |
% Likelihood | Percent likelihood allows you to factor the likelihood of winning a contract into your analytical reports. Thus allowing you to accurately forecast metrics like revenue projections. On just a single project this may not seem very useful, but on a large number of projects the aggregate effect is useful. For example i you had $1MM of projected sales you can cross-reference this against your sales funnel as it narrows from 25%, to 50% to 75% likelihood. This helps you to accurately predict your future revenue and staffing requirements. Projector also uses the Percent Likelihood information in Project Dashboard KPIs. Please see the next section in this table, Base on Stage, for more information regarding this feature. |
Base on Stage | Tick this checkbox to have the percent likelihood automatically determined by the project's stage. As the stage changes the likelihood automatically updates. A typical scenario may be a 50% chance in the sales phase that becomes 100% once it is in the delivery stage. You may want to untick this box and specify the percent likelihood manually. Often a project manager is intimately familiar with the project and accurately understands its true likelihood - upping the percentage of a project you are confident you will win or dialing back the likelihood on a project that you know is a long shot. |
Location | The location associated with this project. Locations are used for projects, resources, time, and expense entry. |
Manager | Project managers control a number of aspects of a project. Through a combination of stage permissions and installation settings PMs can request or schedule people to work on the project, create project plans, invoice for projects, set billing rates, and create budgets. How much or little a PM can do depends on your organization and its business needs. When you expand the Manager drop-down list, the following items are displayed:
If you don't see the person you want click <<lookup>> and you can specify any user you want. |
Begin Date and End Date | The project start date is required. The project end date can be left blank(no end date) to accommodate ongoing projects. These dates control four aspects of a project:
If you are editing an existing project and cannot move the project start date forward, then one of the four items above has caused a conflict. You will need to resolve the conflict, for instance by moving role start dates forward first. When you set a project to a closed stage, we will automatically populate the end date with either today's date or the earliest possible date given the constraints discussed above. |
Hours/Day | By default this field's value is inherited from the project's location. It serves two primary functions. First, it is used for detailed task management planning to figure out how many days something will take to complete. DTM scheduling is done in hours. So (Hours per Day) / Hours = Days of Work. For example, (20 hours of work) / (8 hours per day) = 2.5 days of work. Second, this setting is used for daily billing calculations. Daily billing rounds time up to equal a whole day. For example, if I work 5 hours today, then it gets rounded up to 8 hours of billable labor. Utilization This field is not used in utilization reports. Utilization is measured by looking at a resource's working hours vs. the number of hours they actually worked. Working Hours and Hours/Day are not the same and should not be confused. |
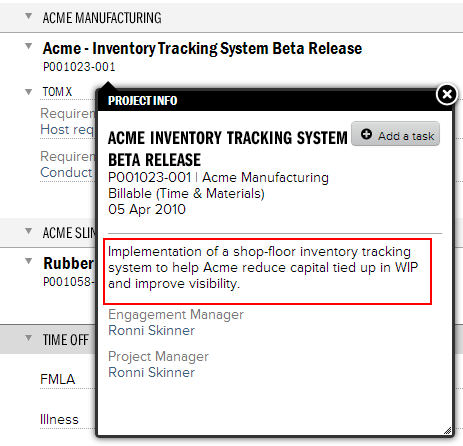
Description | Provide a brief description of the mission for this project. This description is visible in time and expense entry when your resources enter their data. Descriptions may be up to 1000 characters long.
|
Project Users
Underneath the information area you will find a grid of administrators for this project. Users in gray cannot be edited. They consist of the following users:
- Engagement Manager
- Project Manager
- Users with the cost center permission Can Act as PM
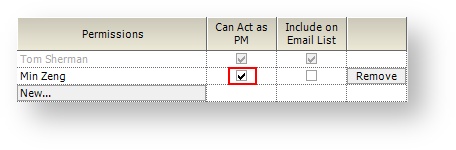
You can add additional project users from the New button. People added to this list are granted view access to this project and reports about this project. They are typically administrators or project managers.
You can elevate these additional view-only users to full Project Manager status by ticking the Can Act as PM checkbox. From there they can do nearly everything the actual PM can do. The only exception being time/cost approval where it is not set to PM Team Approval.
Tick the Include on Email List checkbox if you want any project related emails to also go to this person.
- Requested hours
- Booked hours
- Budget alerts
- Stage changes
- Project creation
- Engagement creation
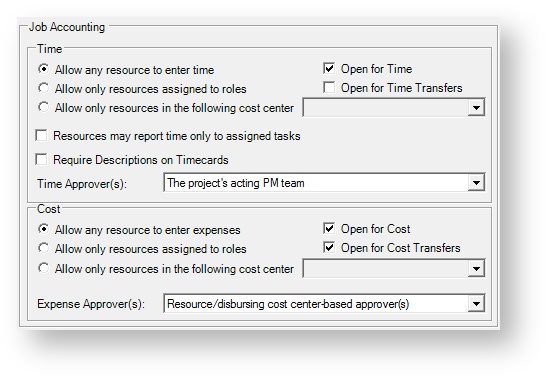
Job Accounting
This section contains settings governing who can enter time/expenses and who can approve them. The defaults are determined by the Engagement Type Editor.
Job accounting fields can be locked down based on project stage in the Project Stage Editor.
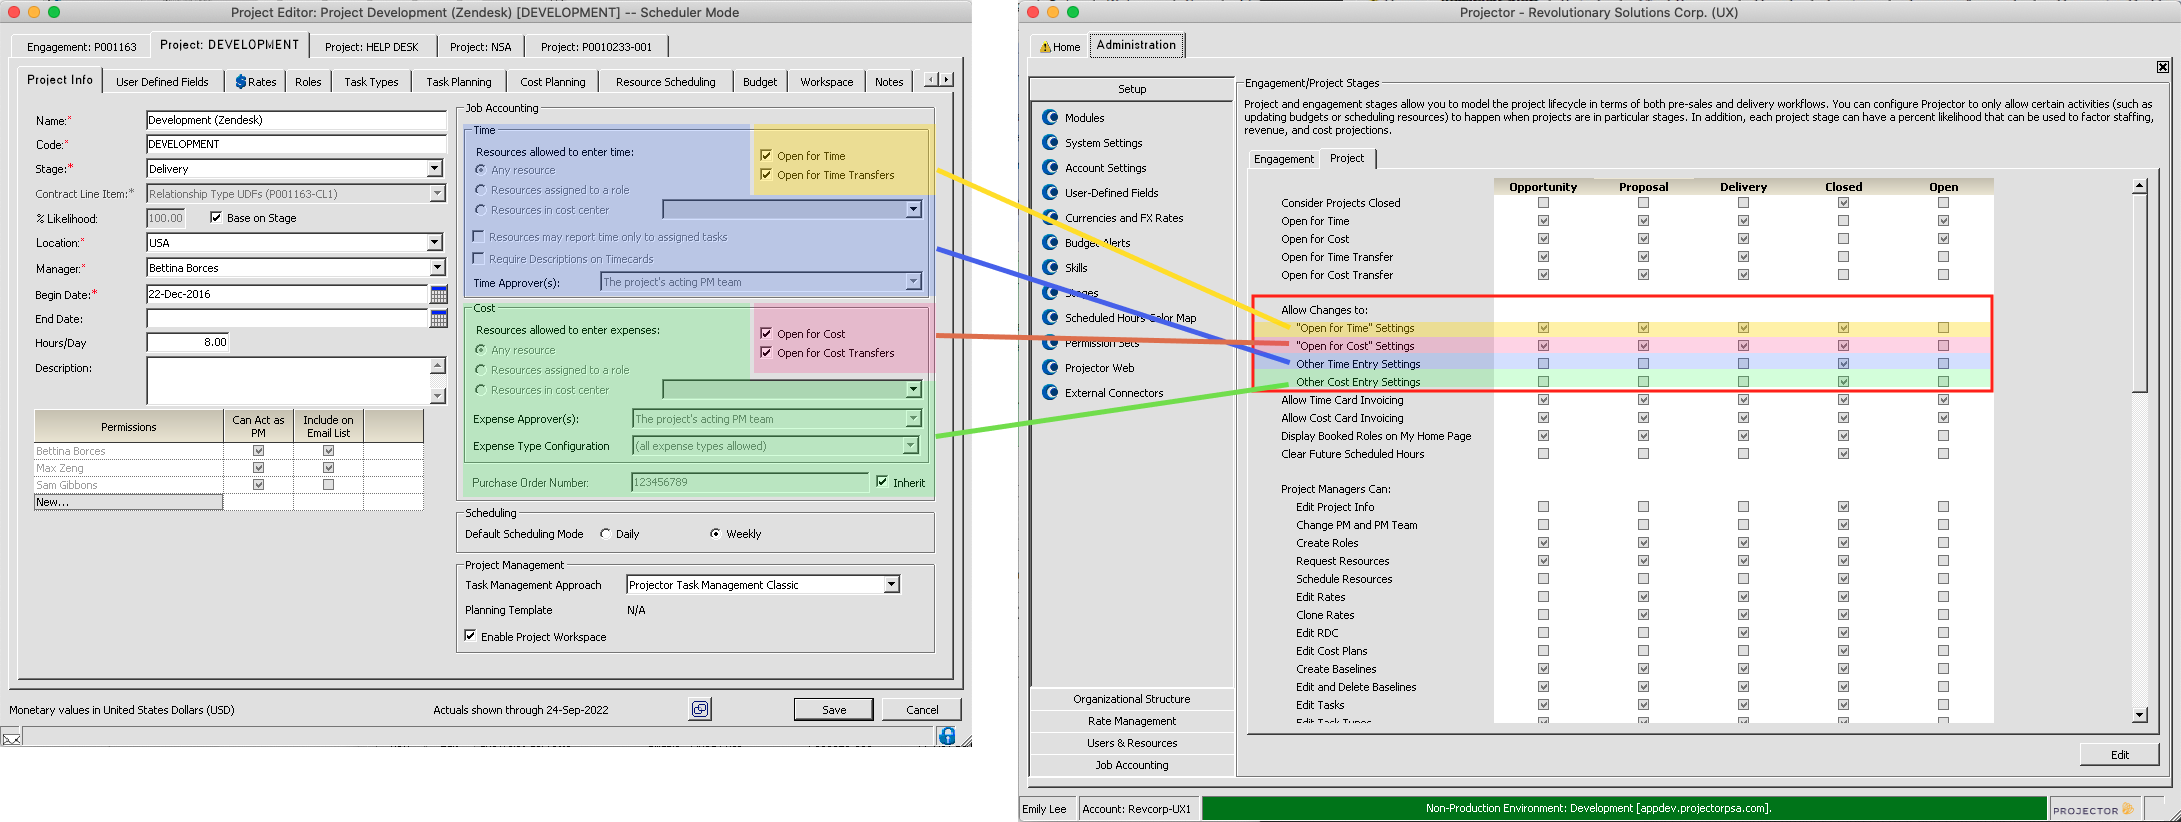
When these settings are turned off for a given project stage, the relevant input controls in both the Management Portal and Projector Web will be read-only for all users. To enable the input controls for a project, the project must be moved to a stage where the input controls allow changes to be made (or the current stage must be enabled for edit temporarily).
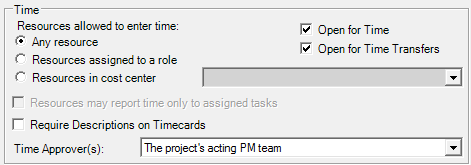
Time
For an in depth introduction to time approval setup and configuration, please read our Time and Expense Approval how to
An explanation of each setting is provided in the table below.
Control | Description |
|---|---|
| Any resource | Anyone can enter time, excluding resources with the limited access flag enabled who must have an assigned role |
Resources assigned to a role | Only resources that are explicitly requested or booked to this project can submit hours. Even if the number of hours is zero. This is useful when you have a specific team and only that team should be working on this project. |
| Resources in cost center | Any resource under the specified cost center as of today, can enter time. Excluding resources with the limited access flag enabled who must have an assigned role. |
Resources may report time only to assigned tasks | This setting is only available if the Detailed Task Management checkbox is ticked under the Project Management section (see further down in this help document for a fuller explanation). When ticked, only resources who are assigned to a particular task can submit time against it. |
Require Descriptions on Timecards | All resources must include a description for each time card submitted. Time cards without descriptions will be automatically rejected and returned to the resource for correction. |
Open for Time | Allow time to be reported for work done on this project. By default, the current stage determines this setting. However, you can override the setting if need be. |
Open for Time Transfers | Allow time cards to be transferred onto this project. By default, the current stage determines this setting. However, you can override the setting if need be. |
Time Approvers | Open the drop-down menu to choose who will be responsible for approving time cards submitted to this project.
See our Time and Expense Approval article for a detailed walk-through of time approvals and configuration. |
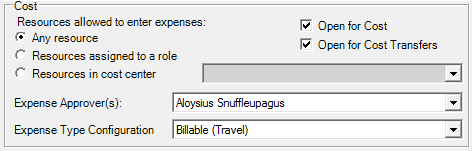
Cost
For an in depth introduction to expense approval setup and configuration, please read our Configure Expense Approval how-to.
An explanation of each setting is provided in the table below.
Control | Description |
|---|---|
| Any resource | Anyone can enter expenses, excluding resources with the limited access flag enabled who must have an assigned role |
Resources assigned to a role | When ticked, only resources that are explicitly requested or booked to this project can submit expenses. Even if the hours are zero. This is useful when you have a specific team and only that team should be working on this project. |
| Resources in cost center | Any resource under the specified cost center as of today, can enter time. Excluding resources with the limited access flag enabled who must have an assigned role. |
Open for Cost | Allow expenses to be reported against this project. By default, the current stage determines this setting. However, you can override the setting if need be. |
Open for Cost Transfers | Allow cost cards to be transferred onto this project. By default, the current stage determines this setting. However, you can override the setting if need be. |
Expense Approver(s) | Open the drop-down menu to choose who will be responsible for approving cost cards submitted to this project. Remember that regardless of permissions granted here, Projector does not allow anyone to approve their own expenses. See Configure Expense Approval for a full explanation of these choices
|
| Expense Type Configuration | Choose from the dropdown list which expense types are allowed. To configure your allowed expense types, please see the Expense Type Configurations Editor. |
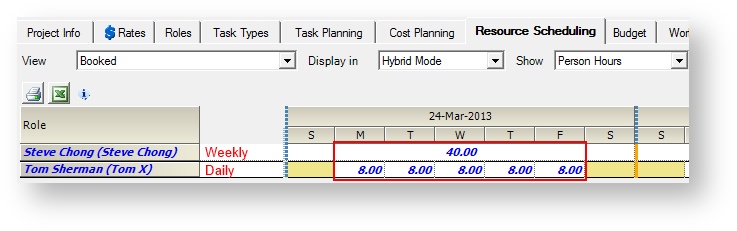
Scheduling
The Default Scheduling Mode for New Roles setting determines how your schedulers will block out hours for each employee scheduled on the project. Later, your schedulers can override this setting as necessary.
The default for this setting is determined by its Engagement Type Editor.
Choose from either:
- Daily – Use daily mode to assign the number of hours someone needs to work every day
- Weekly – Use weekly mode if you do not care on what day the work is done, just that it is done that week
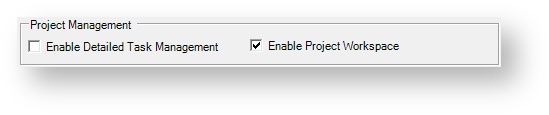
Project Management
You must have permission to cost center permission Maintain Projects and Engagements to tick or untick these checkboxes.
Control | Description |
|---|---|
Enable Detailed Task Management | When ticked, this checkbox enables the Task Planning tab of the project editor. On that tab you create Gantt charts, make baselines, and measure your performance against those baselines. See the Task Planning Tab help page for more information about how DTM works. Turn DTM ON You can always turn DTM on. When it is turned on, all existing task types are converted into a corresponding task. All existing time cards then map to the new DTM tasks. Turn DTM OFF When you turn DTM off, the plan is collapsed up to the task type level and all DTM detail is lost. You cannot recover this information. Consider exporting the task plan prior to disabling DTM. You cannot turn DTM off in the following cases:
|
Enable Project Workspace | Check this box to enable the Project Workspace. A workspace is an online portal that allows team members to share notes, files, log issues, and otherwise collaborate on projects. In addition, your clients can view their invoices in a workspace. |