Project Resource Scheduling Tab
The resource scheduling tab is used primarily for requesting resources and booking those requests. To learn about how and why the request/booking procedure is done, please see the Scheduling How-To. This tab is also useful for viewing working schedules for people on the project, revenue metrics like Billing Adjusted Revenue or Resource Direct Cost, and the variance between booked/approved hours.
This tab is reached by opening a project and choosing the Resource Scheduling tab.
Permissions and Settings
The changes you are allowed to make on this tab are dependent on how the project was opened. Projects can be opened in one of three modes - Scheduler Mode, Project Manager Mode, or View Project. Your current mode is displayed in the window title bar.

Projector opens projects in the most permissive mode possible. For example, if you can schedule resources on this project then it opens in scheduler mode. You can override the mode by right-clicking the project and choosing the mode you want.

The following people can request resources when the project is opened in Project Manager Mode:
- Engagement/Project Managers who have the stage permission Project Managers can Request Resources
- Anyone with the cost center permission Request or Schedule Resources AND the cost center permission Request or Schedule Engagements AND the stage permission Users with Permissions can Request Resources
The following people can book resources when the project is opened in Scheduler Mode:
- Engagement/Project Managers who have the stage permission Project Managers can Schedule Resources
- Anyone with all three of the following conditions:
- Project stage permission Users with Permissions can Schedule Resources
- Cost center permission Request or Schedule Resources for the resource's cost center
- Cost center permission Request or Schedule Engagements for the project's cost center
- Anyone with all of the following conditions:
- Project stage permission Users with Permissions can Schedule Resources
- Cost center permission Request or Schedule Resources for the resource's cost center
- Role has hours that have already been booked
You might be wondering why you need no less than three conditions to schedule a role. The answer is that this gives you fine-grained control over what your schedulers have access to. For example, I can say that schedulers are allowed to book Tom on engagements in the USA only.
Request / Book Workflow
The main purpose of the resource scheduling tab is to request or book resources. A full overview of this process is covered in our Scheduling Overview How-To. The basic idea goes like this:
- A Project Manager requests resources on a project. They may request people by name or by criteria. For example, I want Fred or I want a Graphic Designer.
- A Scheduler reviews the request to see who is available
- The Scheduler books the resource and hours. They may fulfill the request in full, or only partially.
- The Project Manager reviews the booked resource and hours. The PM can then make additional requests or accept things as they are.
The following sections assume that you have already created Roles on your project. A role represents someone who will be working on the project.
Request a Resource
A PM starts a request by going to the Resource Scheduling tab and making sure the three dropdown boxes are set to:
- Current Requested
- Daily/Weekly (Please see the scheduling mode section of this page if you are confused about the daily/weekly choice.)
- Person Hours
Each white cell is for a role and a time period. The PM types into the cell the number of hours they need. This becomes a new Request. The row turns blue and a flag ( ) is displayed, showing that you have a new, open request.
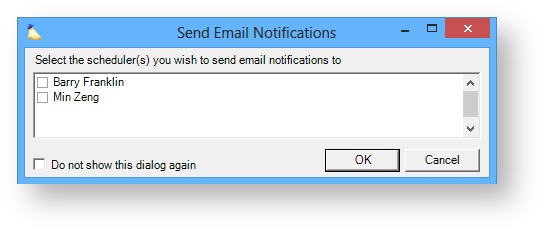
When you save your changes you have the option of sending an email notification to valid schedulers. If you don't see this dialog, then you have hidden it.
Schedule a Resource
Now that a request is in place, it is up to the scheduler to review and fulfill that request. We recommend schedulers use the Resourcing Dashboard for this, but requests can also be fulfilled on this tab. The scheduler starts by opening the project. They will see the red flag indicating an open request.
The scheduler now has some choices they can make. Some possible choices are to:
- Book the full amount of requested hours
- Book less than the amount of requested hours
- Book the preferred resource that was requested
- Book a different resource than the requestor preferred
- Book the hours, but don't specify a resource yet
To book the requested hours:
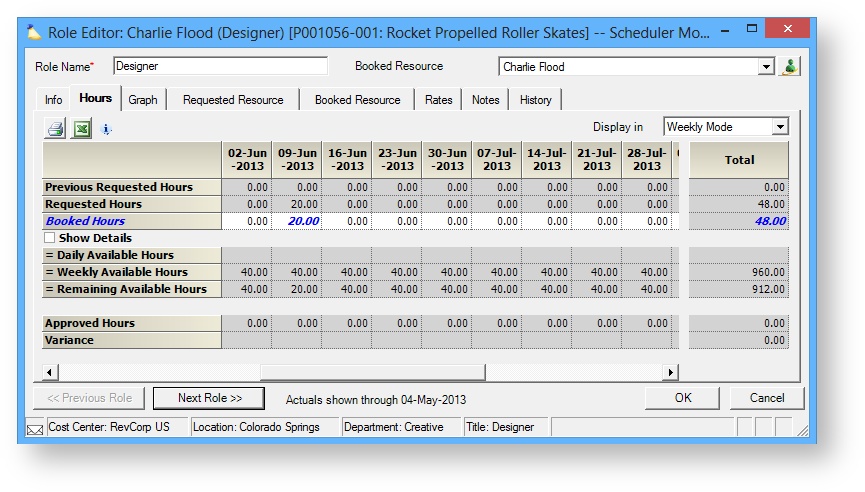
- Double click on a role with an open request . This opens the Role Editor.
- On the hours subtab you will see one row for requested hours and a second row for the number of booked hours. Any delta between the two indicates a decision to be made.
- Enter into the white cell the number of hours you want to approve.
- The newly booked hours change to blue and the request flag is cleared.
- Close the dialog and save your changes.
When you create the request you will be prompted to send out email notifications. If you don't see this dialog, then you have hidden it. The project's mailing list is the EM, PM, and any additional PMs marked to receive emails. Roles that have changes will be displayed. Tick the checkbox for each person you wish to notify.

Special Scheduling Scenarios
You may run into one of the following special situations where you want to manually control whether the request is open or closed.
First, the scheduler may wish to refuse a request. Request are typically closed automatically by booking some or all of the hours, but this can't happen because you are rejecting it in full. Instead, right click on the role and choose Open Request to manually clear the flag.
Second, the scheduler may fulfill part of the request, but wants to finish the fulfillment at a later time. Once you have made your changes the request flag is automatically cleared. Right click the role and choose Open Request to manually reactivate the request.
Entering Hours
Projector provides a number of ways to enter hours into the grid. This is meant to speed up data entry.
Daily/Weekly Scheduling
Some organizations choose to schedule people by the day vs. the week. If you schedule people by the week then you just care that the hours are completed during that week. For example, I want Charlie to work 30 hours this week. He can work ten on Monday, and twenty on Tuesday. I don't really care as long as he gets the hours in. For companies that always schedule resources by week, we recommend that you set the control to Weekly Mode and leave it there. Similarly, for companies that always schedule resources by day, we recommend that you set the control to Daily Mode and leave it there. However, if your company commonly schedules resources in a combination of both daily and weekly manners, we suggest that the Hybrid Mode setting is the best for you. Regardless of your choice, you may simply switch between the modes at any time.
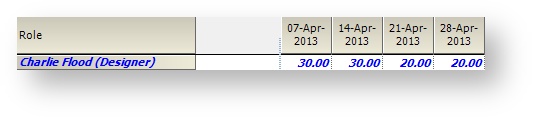
Alternatively you can schedule someone in daily mode. In this case you want the more granular scheduling option. In the screenshot below Charlie is still working thirty hours for the week, but I have specified on what days he needs to work certain hours.

To switch a resource between weekly and daily scheduling, right click on the role and choose Change Scheduling Mode. When filling in the grid, make sure that the Display In dropdown matches the resource's mode. For example, if Charlie is in daily mode, change the dropdown to Daily.
We also offer the Hybrid option so that you can edit both daily and weekly simultaneously. In the Hybrid Mode example below we see that Katrina Wright is scheduled in a weekly allocation, while Kyle Cook is scheduled to a specific number of hours each day of this week.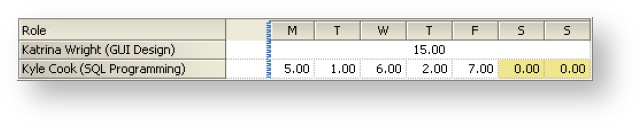
Fill
Quickly populate a resource's schedule by right-clicking on a role and choosing Fill.
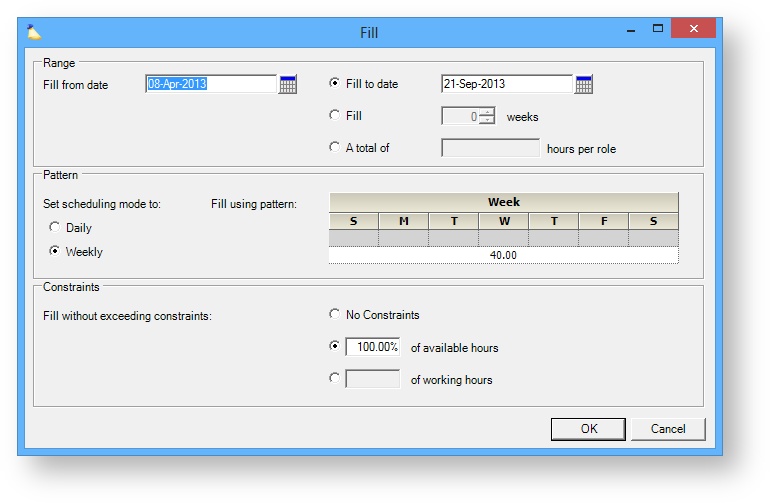
Range
Use these options to control the date range that will be affected by the fill. The initial settings will reflect the range of dates that you originally selected, however you may change these settings as desired. You specify a range by selecting a Fill from date and either a Fill to date, a number of weeks or a total number of hours.
| Option | Description |
|---|---|
| Fill from/to date | Specify the first date that will get filled by pressing the calendar button, which opens a calendar. If a Fill to date is given, Projector will fill all days starting with the Fill from date and ending with the Fill to date. |
| Fill | If this option is chosen, Projector will fill the specified number of weeks, starting with the Fill from date. |
| A total of | If a total hours per role is given, Projector will attempt to fill the specified number of hours, starting at the Fill from date and extending as far as possible into the future. Note that if you specify the date range using this option in conjunction with a constraint to available or working hours, there is a possibility that Projector will not be able to fill the prescribed amount of hours due to a lack of available or working hours for a role. If this is the case, Projector will fill as many hours as it can and inform you of the role or roles for which it was unable to completely satisfy your fill request. |
Pattern
Use these options to specify what values Projector should use when filling. You choose whether to set the scheduling mode to daily or weekly for each filled week and the pattern of hours to use when filling.
| Option | Description |
|---|---|
| Daily/Weekly | Choose whether you want to fill hours by week or day. See the daily/weekly scheduling section of this page for more information. |
| Fill Using Pattern | Enter hours by the day (top row) or week (bottom row) |
Constraints
Use these options to optionally enforce constraints while the fill operation is being performed:
| Option | Description |
|---|---|
| No Constraints | Do not apply any constraints, fill each cell with the requested number of hours regardless of available or working time. |
| % of Available Hours | Do not exceed a given percentage of available hours in any cell. |
| % of Working Hours | Do not exceed a given percentage of working hours in any cell. |
Advance/Delay
Advancing or delaying a schedule often happens when managing your projects. Projector allows you to advance or delay roles, groups of roles or your entire schedule. See Advance or Delay Schedule.
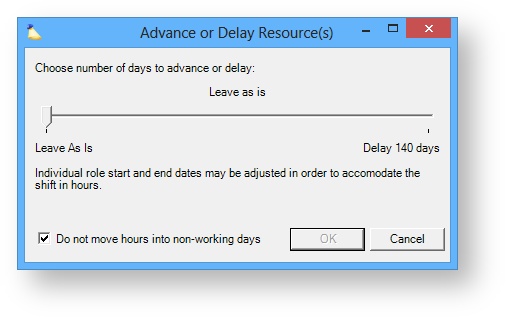
Delay from Date
The advance/delay feature affects the entire date range for the roles. Sometimes you want to delay just a portion of hours. For example, all work after September 1st. This will need to be manually delayed. You can export the hours to Excel, make your changes, and then cut/paste them back into Projector.
Copy From
Auto-populate the cells by right clicking on a role and choosing Copy From.
Extend Schedule beyond grid
If you have completely filled the scheduled hours grid, click the right scroll arrow to add additional weeks.
Notes
Notes are used to convey information between requestors and schedulers. Notes can be added in two places. You can add notes by editing the role and selecting the Notes tab. Roles with a note display a  icon.
icon.
Notes can be shown on a resource's home page if the system setting Show allocation notes on Employee Schedule is enabled.
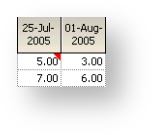
Or you can add notes directly to cells on this tab. A cell with a note displays a small triangle in the upper corner  .
.
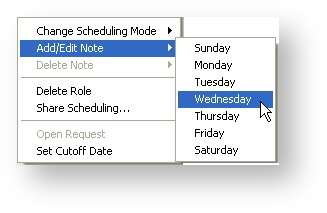
Add Note
Right click on the desired cell and choose Add/Edit Note. You may see an additional sub-menu that enables you to choose which day of the week for the note. This sub-menu appears when you are adding a note for a daily schedule person, but the view is not in daily mode.
Delete Note
Right-click on a cell with a red triangle and choose Delete Note. You may see an additional sub-menu that enables you to choose the day for which the note will be deleted. This sub-menu appears when you are adding a note for a daily schedule person, but the view is not in daily mode.
View Note
Hover your mouse over the cell and the note appears. If you hover over a daily scheduled person, but the view is not in daily mode, then you will see all the notes for that week.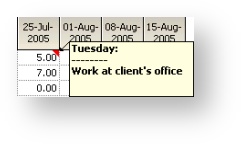
Configure View
There are a number of controls that let you choose what data is displayed and in which format it is displayed:
View
Choose from the View menu which hours you want to look at.
| Dropdown Choice | Description |
|---|---|
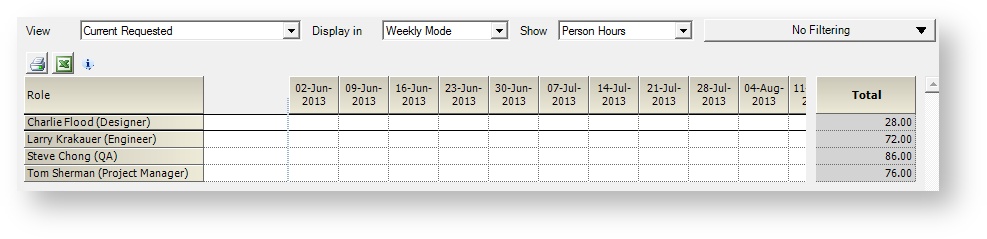
| Previous Requested | When a PM makes a request for hours, the scheduler may choose to only fill part of it. The Previous Requested hours view shows you the original request. The current requested hours shows the delta. For example:
|
| Booked | Number of hours granted by the scheduler |
| Current Requested | When a PM requests new hours, this becomes the Current Requested hours. When the Scheduler grants a portion of the request, any remaining hours become the new Current Requested. |
| Available Hours | The role's normal working hours minus any current booked hours. For example, Charlie works a forty hour week. He is booked for ten hours on other projects. His available hours are 40 - 10 = 30 hours. |
| Working Hours | The number of working hours depend on whether a resource has been assigned to the role yet. For an unassigned role, the working hours are the same as the typical work schedule for the project's location. For assigned roles, working hours are equal to the resource's schedule minus time off and minus any other booked hours they have. |
| Approved | The number of approved hours for this role regardless of the Use Actuals Through Date |
| Variance | The difference between hours that were booked versus hours that were approved. Useful for identifying roles that are reporting more or fewer hours than they were scheduled to. |
| Approved & Current Requested | Show approved hours up to the Use Actuals Through Date and requested hours thereafter. |
| Approved & Booked | Show approved hours up to the Use Actuals Through Date and booked hours thereafter. |
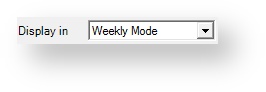
Display In
Projector supports "Rolling Wave" scheduling. This means that for any given week you can choose to request or book hours on a daily or weekly basis. See the daily/weekly scheduling section of this page for more information. You want to choose the
| Dropdown Choice | Description |
|---|---|
| Daily | Choose if you schedule your resource down to the day. For example, please work in this role for six hours on Tuesday. |
| Weekly | Choose if you schedule your resource down to the week. For example, please work in this role for thirty hours this week. |
| Hybrid | Enter information for both weekly and daily simultaneously. |
Show
| Dropdown Choice | Description |
|---|---|
| Person Hours | |
| Contract Revenue | |
Billing Adjusted Revenue | |
| Resource Direct Cost |
Filters
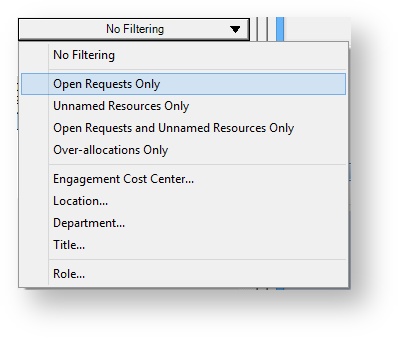
Filter out roles you are not interested in. Projector offers the following filter options.
- – Roles are displayed without filtering.
- – Displays only the roles with open requests.
- – Displays only the roles with unnamed resources.
- – Displays only the roles with open requests and unnamed resources.
| Filter | Description |
|---|---|
| No Filtering | Show all roles |
| Open Requests Only | Roles with unfulfilled requests |
| Unnamed Resources Only | Roles that have not yet been assigned |
| Open Requests and Unnamed Resources Only | Show both of the previous two options |
| Over-allocations Only | Only show roles that have a red exclamation mark  |
| Engagement Cost Center... | A pop-up is displayed, allowing you to choose which cost centers you want to see roles for |
| Location... | A pop-up is displayed, allowing you to choose which resource locations you want to see roles for |
| Department... | A pop-up is displayed, allowing you to choose which resource departments you want to see roles for |
| Title... | A pop-up is displayed, allowing you to choose which resource titles you want to see roles for |
| Role... | A pop-up is displayed, allowing you to choose which role names you want to see roles for |
Special Icons
You will see special icons displayed next to a role name in the following circumstances.
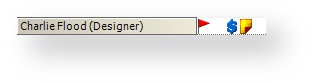
Open Request
A red flag, , is shown when a request has been made for hours and has not yet been fulfilled by a scheduler.
Overallocated
A red exclamation mark, , is shown when a resource has more hours requested or booked than they typically work in a week.
Rate Override
A blue money sign (![]() ) is shown when the role has an override for the resource's standard billing rate.
) is shown when the role has an override for the resource's standard billing rate.
Note
A yellow note icon, , is shown when there is an unread note on the role's Note tab.
Shared Resource
A pair of arrows icon, ![]() , is shown when a resource is shared from another cost center.
, is shown when a resource is shared from another cost center.
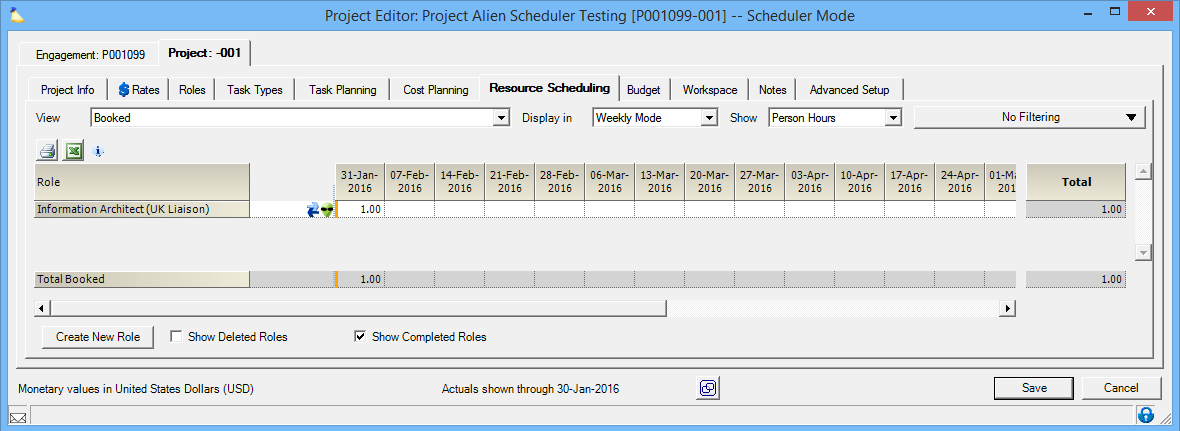
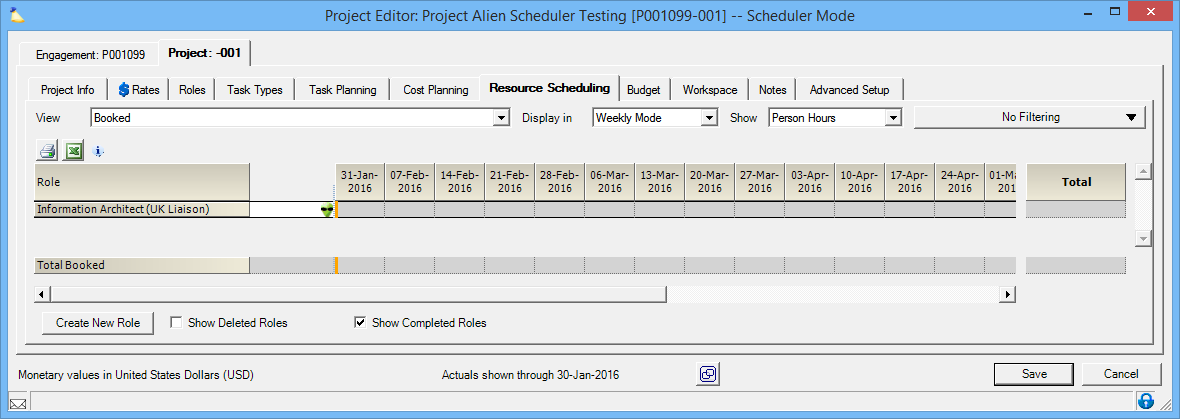
Alien Resource
A alien face, ![]() , is shown when a resource is shared from another cost center for which you do not have permission to schedule.
, is shown when a resource is shared from another cost center for which you do not have permission to schedule.
Sharing Resources (Alien Resources)
Alien Resources are resources that are borrowed from one part of an organization for project delivery in another part. For example, a USA project requires someone from the UK to work on it. By default, this may not be possible because your users with request/schedule permissions don't get to schedule people outside their cost centers. The alien functionality allows a scheduler from the USA to ask a scheduler in the UK to borrow a resource for a project. From then on, the USA manager can schedule that resource for that project.
Note - if requesting/scheduling is done by project managers, then none of this applies. Project managers can schedule regardless of the resource's cost center.
Note2 - you can completely bypass all the below steps by having an administrator who can schedule resources for both cost centers add the role.
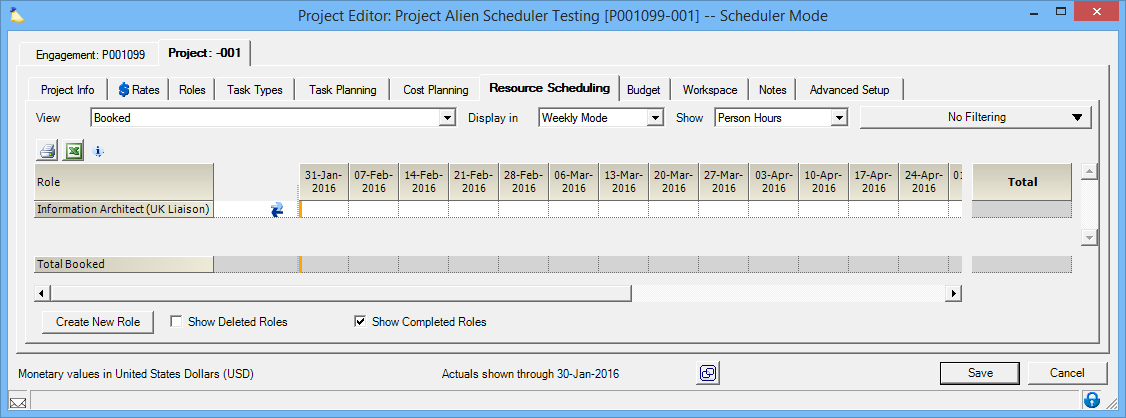
The process is actually pretty simple. The USA scheduler creates a role on their project and specifies the foreign cost center and role attributes they want. For example, I need an Information Architect from the UK. When the role is created a little green alien icon is displayed ![]() . The icon indicates that this is a resource you can't typically schedule. Notice in the screenshot below that our scheduler cannot book any hours yet.
. The icon indicates that this is a resource you can't typically schedule. Notice in the screenshot below that our scheduler cannot book any hours yet.
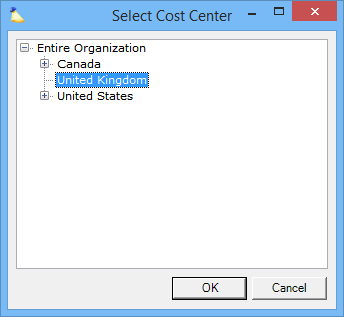
The USA scheduler then right clicks on the role and chooses Share Scheduling. Select the cost center the resource should come from. In this case, United Kingdom.
Once shared, the sharing ![]() icon is shown on the role in addition to the alien icon.
icon is shown on the role in addition to the alien icon.
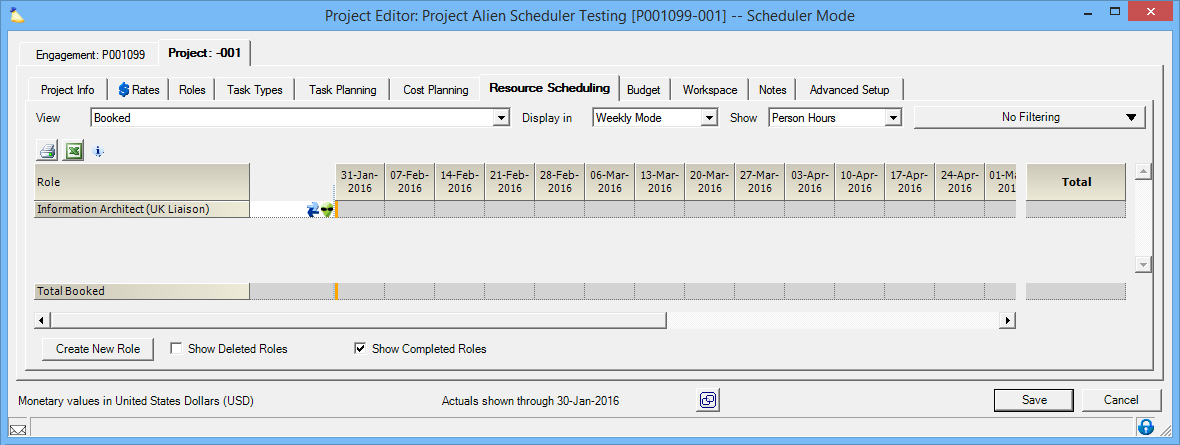
With the role shared, your UK schedulers can access the USA project under their project browsers and view the role. Once opened, they will see the sharing icon for the role. By simply booking a single hour to the role, the UK scheduler "agrees" to let the USA scheduler book hours for this resource. From this point on, both the USA and UK schedulers can edit hours for this role.
Screenshot of the USA schedulers view once at least a single hour has been booked.