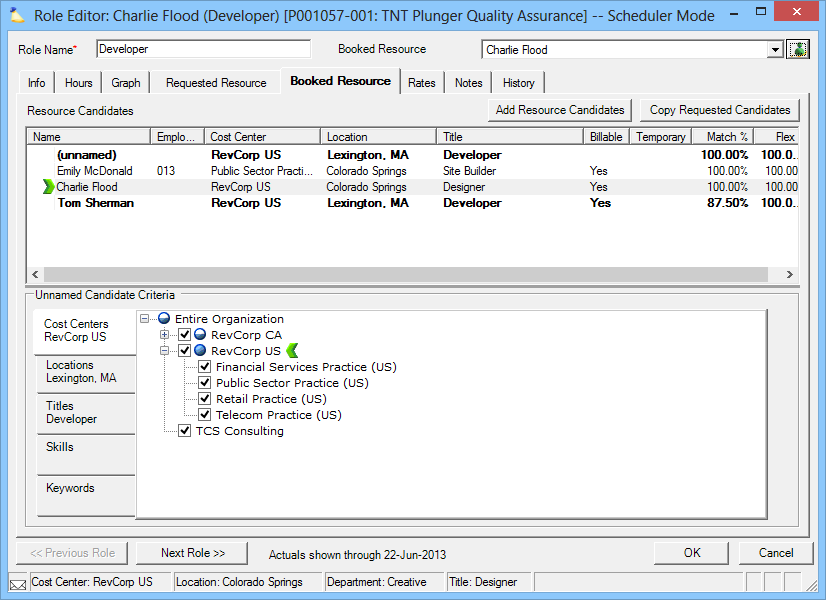
Role Booked Resource Tab
The goal of this tab is to select the best resource to fulfill this role. It is used in conjunction with the Requested Resource Tab where a PM creates a list of appropriate candidates. Your scheduler then reviews the candidate list and can choose someone from the list or find someone else entirely.
This is a subtab of the Role Editor. You will need to open the role editor to access it. Please see the Role Editor documentation for a list of locations that provide access.
Permissions and Settings
To make modifications on this tab, you must open it in Scheduler mode. You can tell a project is opened in Scheduler mode by looking at the window title.

The following people can book resources when the project is opened in Scheduler Mode:
- Engagement/Project Managers who have the stage permission Project Managers can Schedule Resources
- Anyone with the cost center permission Maintain Projects and Engagements AND the stage permission Users with Permissions can Schedule Resources
- Anyone with the cost center permission Request or Schedule Resources AND cost center permission Request or Schedule Engagements AND the stage permission Users with Permissions can Schedule Resources
The first time you view this tab it will be auto-populated by copying choices from the Requested Resource Tab. If you then make changes to this tab and save, the two tabs will no longer sync.
Once a role has hours logged against it, you can no longer make changes on this tab. If you need to make changes, you will need to reject and delete all time from time entry. This limitation is in place because a role can belong to exactly one resource. If you switched the resource, Projector would not know what to do with the time already entered.
You can tell if a role is booked by looking in the top right corner. The text will read Booked Resource.
To unbook a role, clear all booked hours.
You can only specify location criteria if it is enabled in system settings.
Resource Candidates
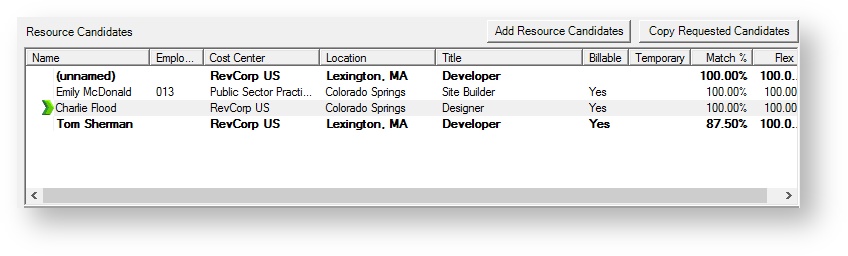
The upper section of the tab lists all the current candidates for this role. By default, this area is populated by the resources that project managers have deemed suitable. However, as the scheduler you can make whichever changes you deem necessary on this screen. This creates a disconnect between what you see on this tab and what you see on the Request tab. If you want to undo this disconnect, then click the Copy Requested Candidates button. This will copy everything from the request tab and overwrite the current view.
The resource marked with a green chevron ![]() is who will be booked to this role. To specify a different resource, double click on their name. To add more candidates to the list, click the Add Resource Candidates button (discussed below). To remove candidates, right click their name and choose Remove Resource.
is who will be booked to this role. To specify a different resource, double click on their name. To add more candidates to the list, click the Add Resource Candidates button (discussed below). To remove candidates, right click their name and choose Remove Resource.
If the Add Resource Candidates button is grayed out, then the role currently has hours entered against it. You will need to delete these hours (even draft) before the button becomes active.
Candidate Criteria
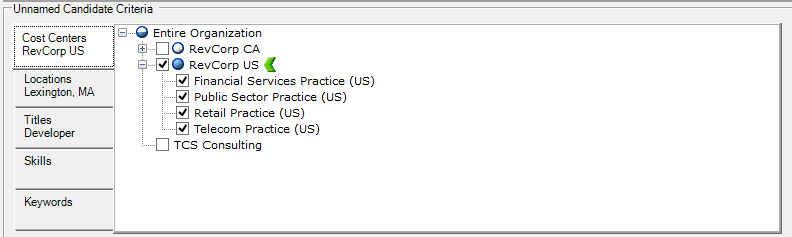
In the lower section of this tab you define criteria that describes this role. For example, I want a Technical Consultant in Boston. This information is then used for several purposes. First, it is used to identify candidates in the top section who are exact matches. Also, if you have an unnamed resource, then this information is used for forecasting in reports.
But, how can it be used in forecasting reports if you can specify a range of data? For example, you could pick both the titles Intern and Director. How does Projector bill? The answer is in those green chevrons ![]() . Each of the first three tabs require that you set a single option as a preferred choice. Now projector has a single cost center, location, and title to use for forecasting.
. Each of the first three tabs require that you set a single option as a preferred choice. Now projector has a single cost center, location, and title to use for forecasting.
Feel free to modify your candidate criteria as your needs change.
Add Resource Candidates
When you click on the Add Resource Candidates button you get a window that looks very similar to the Candidate Criteria section we just reviewed. This window has two tabs. One for searching for characters by the criteria and one for searching by name. Each is discussed below. You will search for someone to add to the candidates list, select them, and choose OK to finalize the selection.
Resource By Criteria
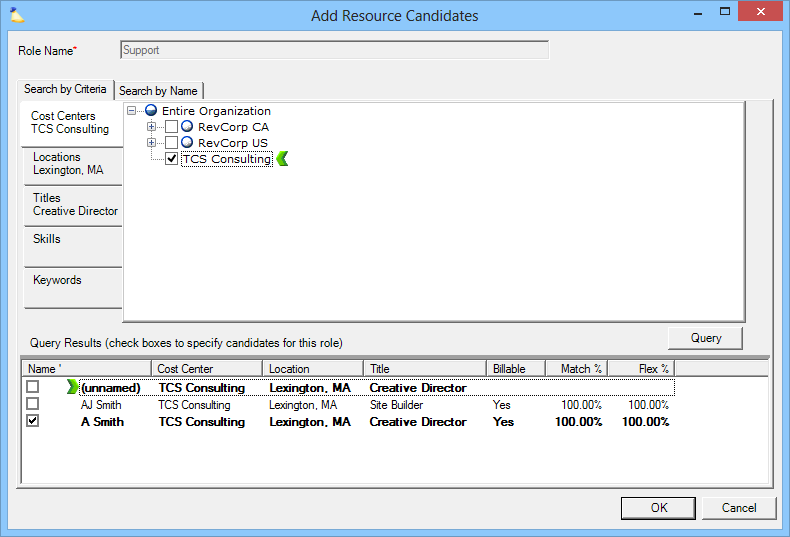
The first tab of the add candidates screen is called Search by Criteria. This allows you to query your organization's entire database of resources to find a match for this role. Notice the five vertical tabs on the left hand side of the screenshot. Each of these are used for specifying search criteria. Once you have specified your criteria click the Query button and the list below populates with your results. Results in bold exactly fit your search criteria. Finally, tick the checkbox for each candidate that you would like the scheduler to consider.
You must have at least one checkbox ticked for each of the first three vertical tabs before you can begin a query. They are Cost Centers, Locations, and Titles. Optionally you can specify Skills and Keywords to refine the search. See the table below for an explanation of each.
Section | Description |
|---|---|
Cost Centers | Press the Cost Centers button and check all appropriate cost centers. You may also select or deselect the cost centers below a cost center by right-clicking and choosing Select cost center plus children or Deselect cost center plus children. |
Locations | Press the Locations button and check all appropriate locations. You may select or deselect all locations by right-clicking and choosing Select all locations or Deselect all locations. You can only specify location criteria if it is enabled in system settings. |
Titles | Press the Titles button and check all appropriate titles. You may select or deselect all titles in a department by right-clicking and choosing Select all titles in this department or Deselect all titles in this department. |
Skills | Press the Skills button and check all appropriate skills. |
Keywords | Enter keywords to be used to search resumes. If you enter anything into the field, only resources that contain at least one resume that matches on the entered keywords will be included. Note that since this involves doing an additional search of documents stored in Projector, queries that specify keywords will not run quite as fast as queries that do not. |
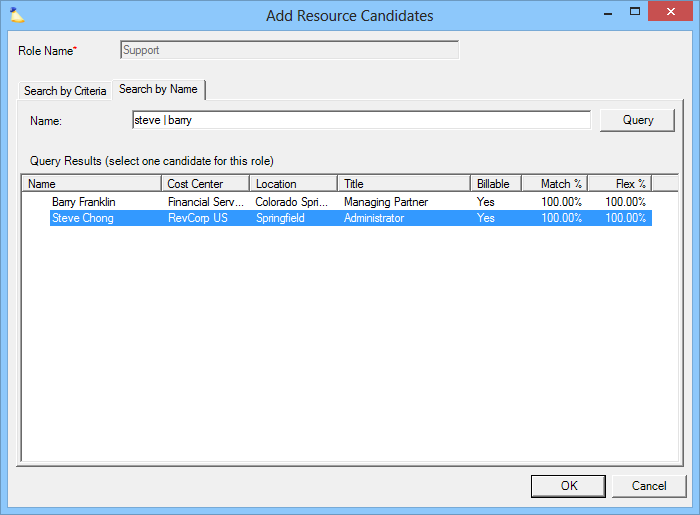
Resource By Name
If you already know the name of the person you want, or just want to see a list of all resources in your organization, choose the Search By Name tab. You can query using advanced search features to return everyone named Charlie or Tom. Or leave the field blank to return all users. Finally, select the person you want from the list and click OK.
Query Results
When you perform a query the results are shown in a grid. The table below defines each grid column. Of particular interest should be the Match % and Flex % columns. These show you how well the specific resource can fulfill this role. You can customize which columns you see in any given grid by right clicking in it and choosing Customize Columns.

All of the following fields are set in the Resource Editor except for Flex and Match percents.
Column | Description |
|---|---|
Name | |
Employee ID | |
Cost Center | |
Location | |
Department | |
Title | |
Billable | Shows Yes for billable in this column, while the column will remain blank for non-billable resources. |
Temporary | Shows Yes if true. Please note that the temporary flag is being phased out by the more powerful Resource Type setting. |
| UDF | An additional column is available for each resource UDF defined in your installation. By default, they are not shown in the grid, but can be added by right-clicking in the grid and choosing Customize Columns. |
Match % | Availability to fulfill requested hours exactly as requested. |
Flex % | Availability to fulfill requested hours within the same time period as the request, but not in the same distribution |
Match % and Flex %
These two values are very useful and warrant a section all on their own. They provide you with percentages so that you can quickly see the likelihood that a candidate has enough availability to fulfill all of the scheduled hours.
Match % - how closely can the resource work all hours exactly as scheduled? Ideally the match percent is 100% and your resource can work all the hours. However, you might see an 80% match which indicates the resource can only cover 4/5 of scheduled hours. This is where flex percent comes in.
Flex % - how closely can the resource work all hours if you were to shuffle hours within the date range? For example, say you scheduled 4 hours a day for next week. But since your resource doesn't work Fridays, the match % is 80%. However, the resource could work those extra hours over the other four days. There flex % is now 100%.
If your match or flex percentages aren't quite perfect, you will probably want to go over to the Role Graph Tab to get a visualization of the resource's commitments and current requested hours.
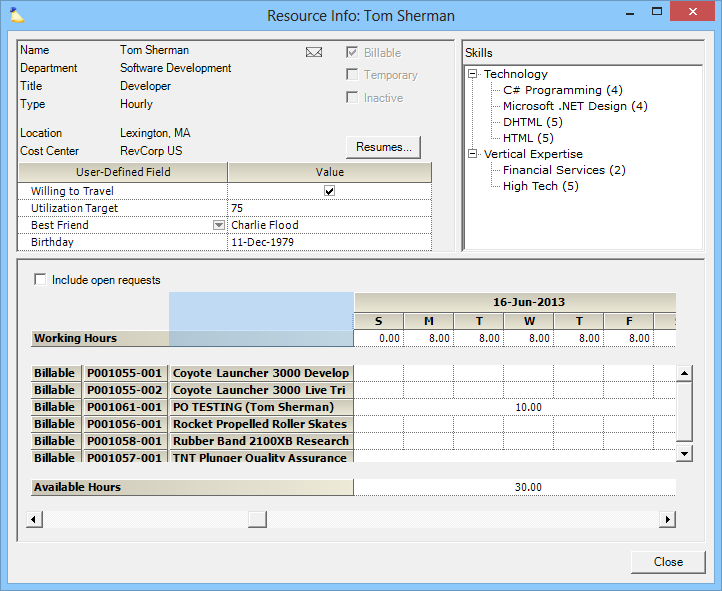
Resource Info
If you want to review a resource for more detailed information, then right-click on them and choose Resource Info. This pops open a read-only dialog where you can view resource data, skills, look at resumes, and view other projects that this resource is working on.